Reviews (3)
You must be logged in to post a review.


£31.20 incl VAT
Compatible with:

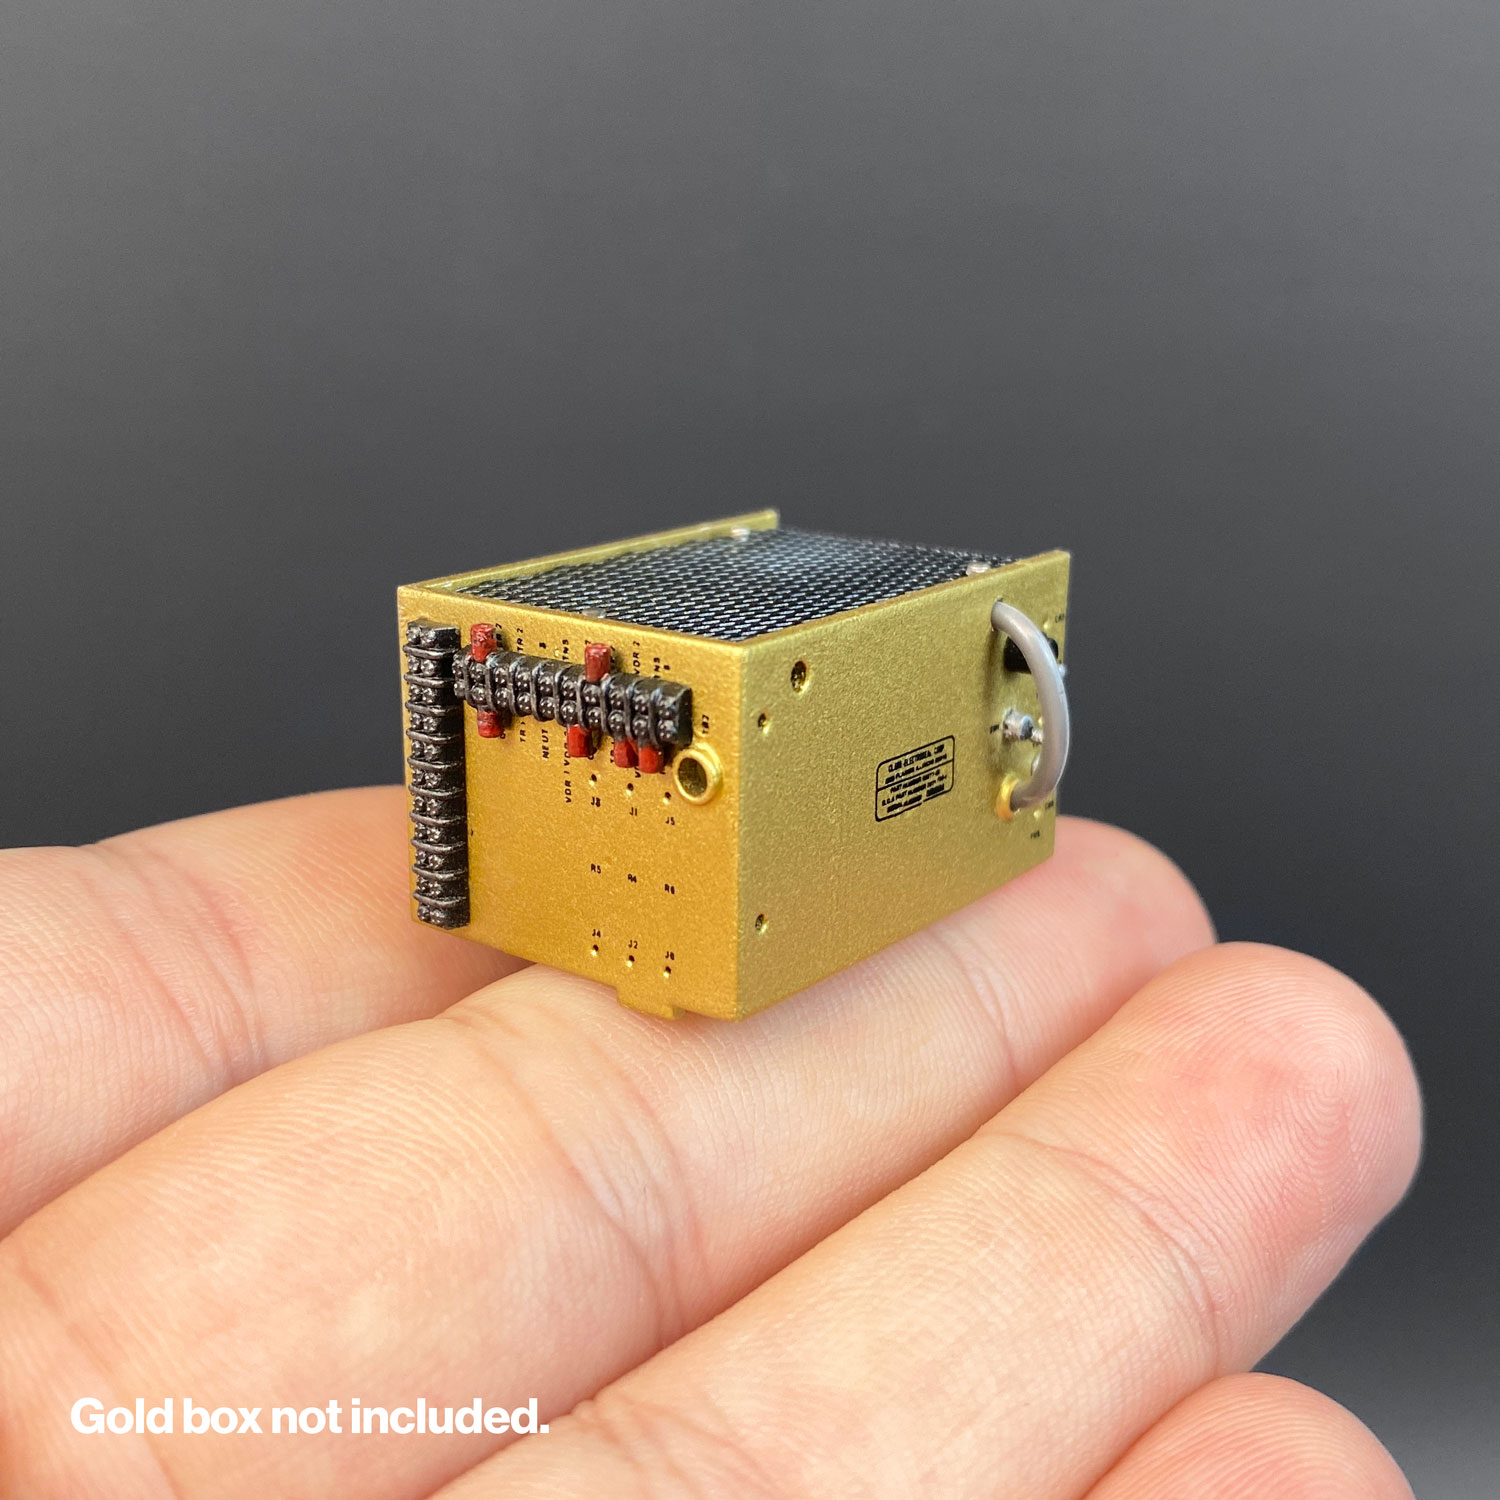
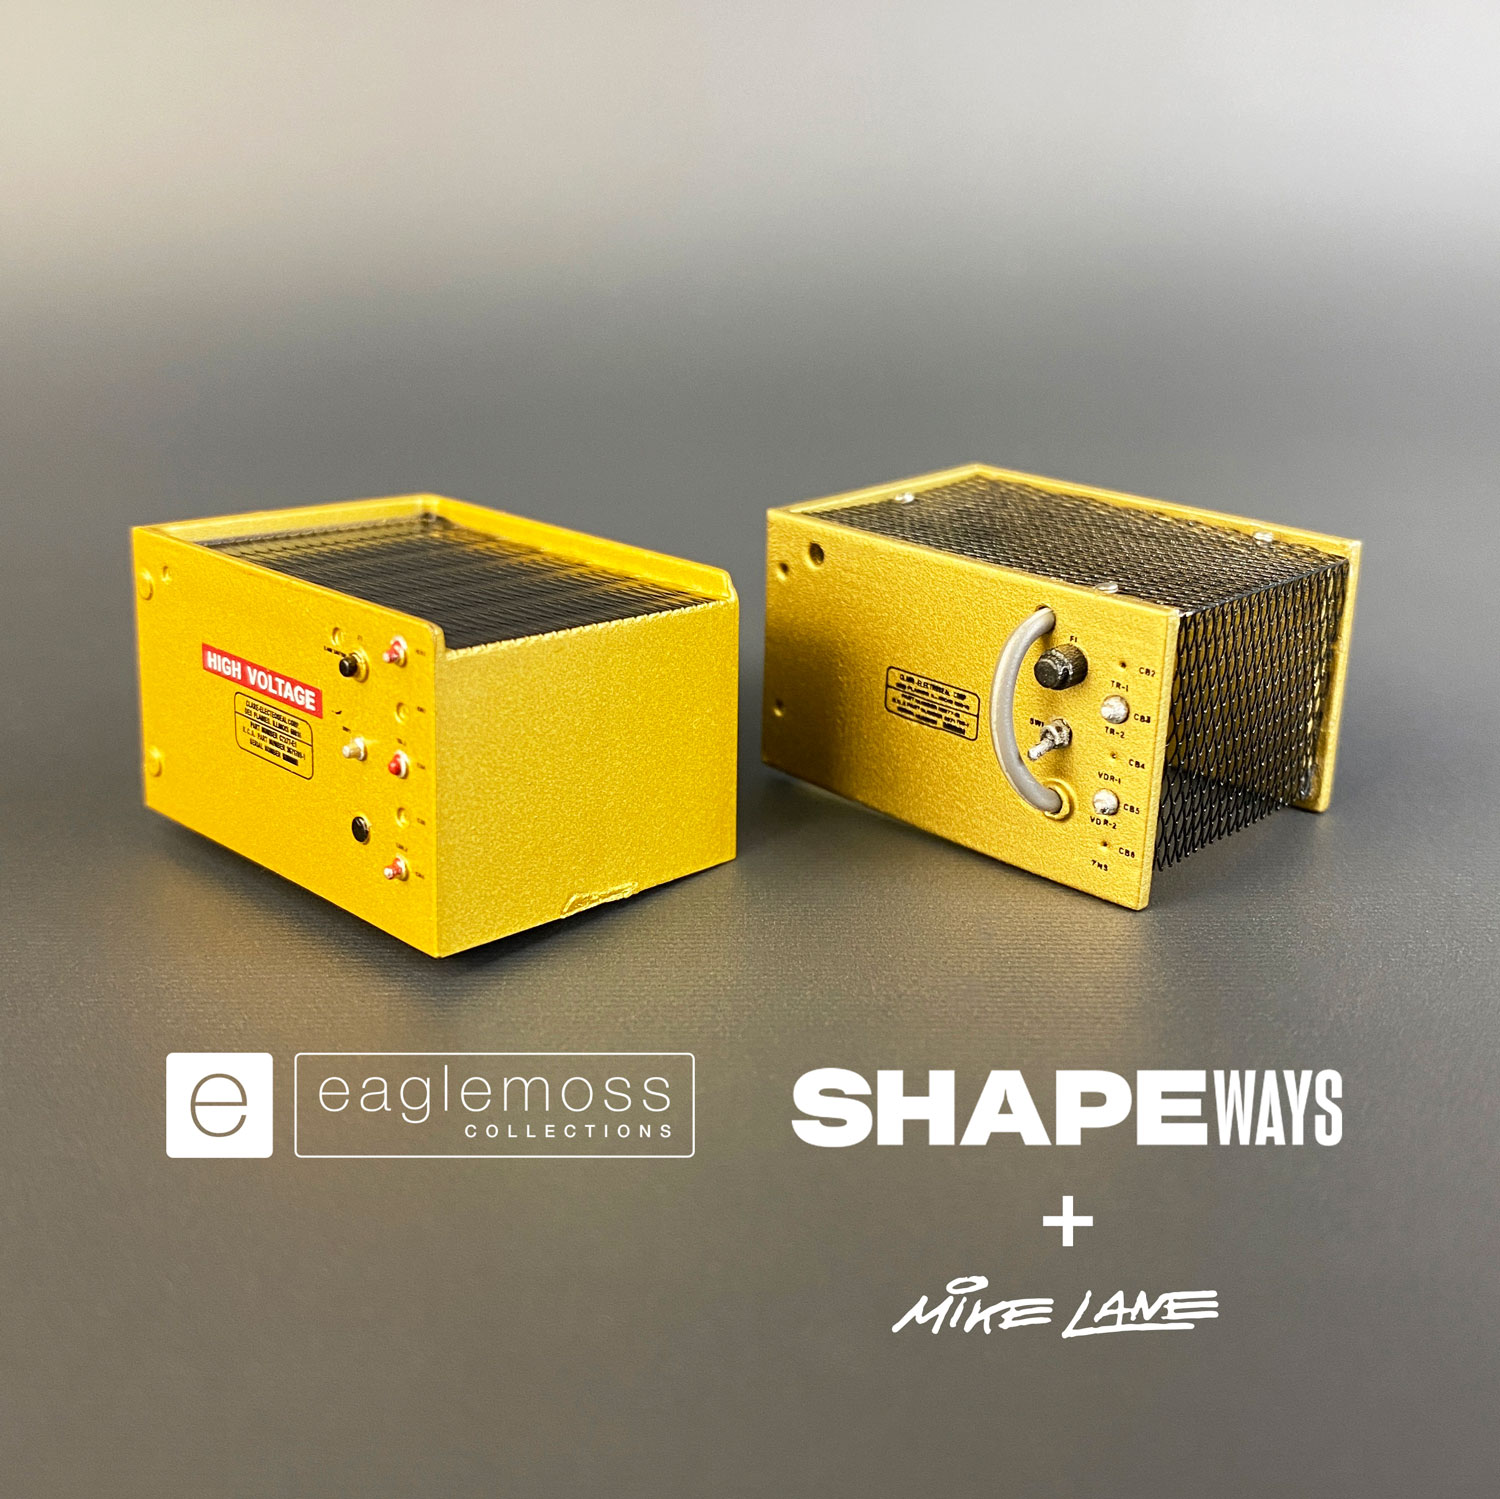
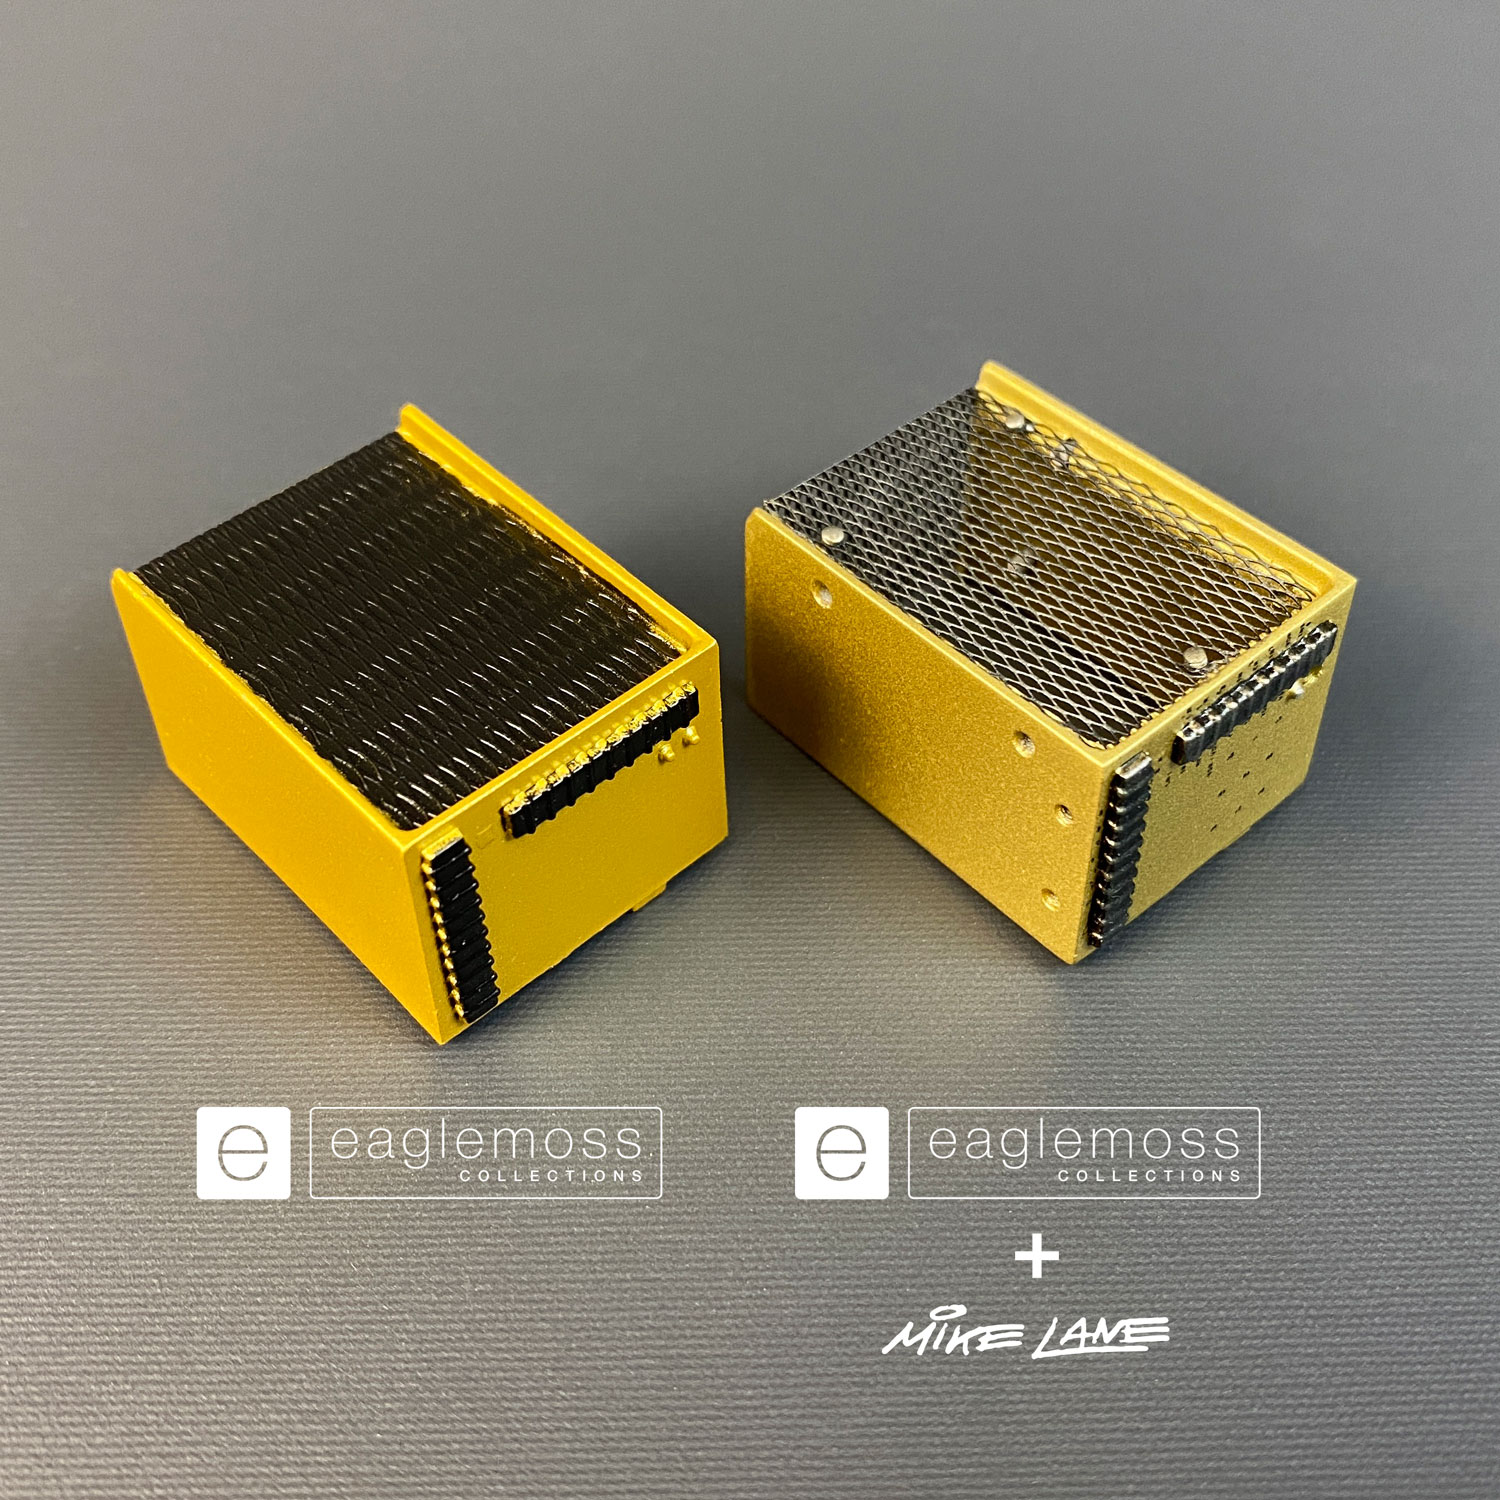
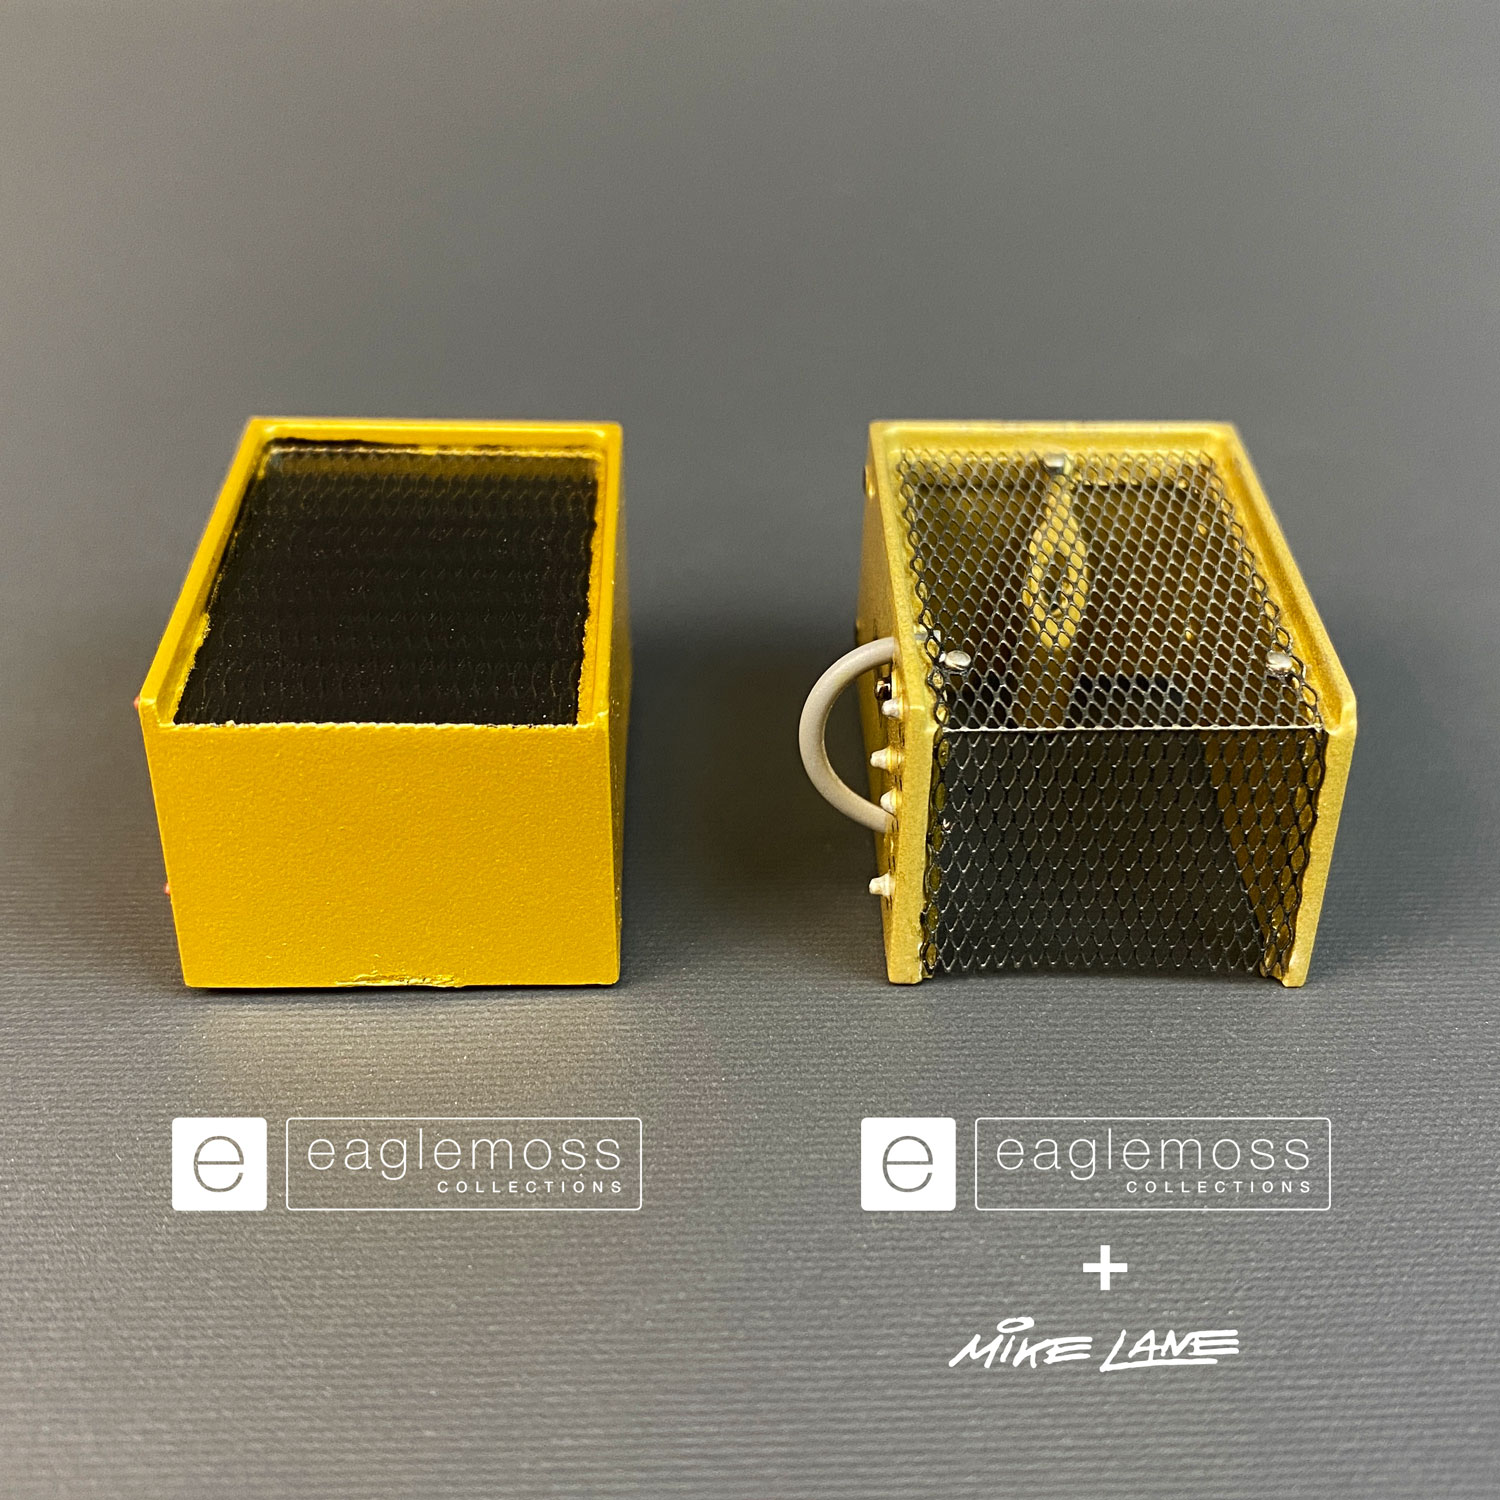
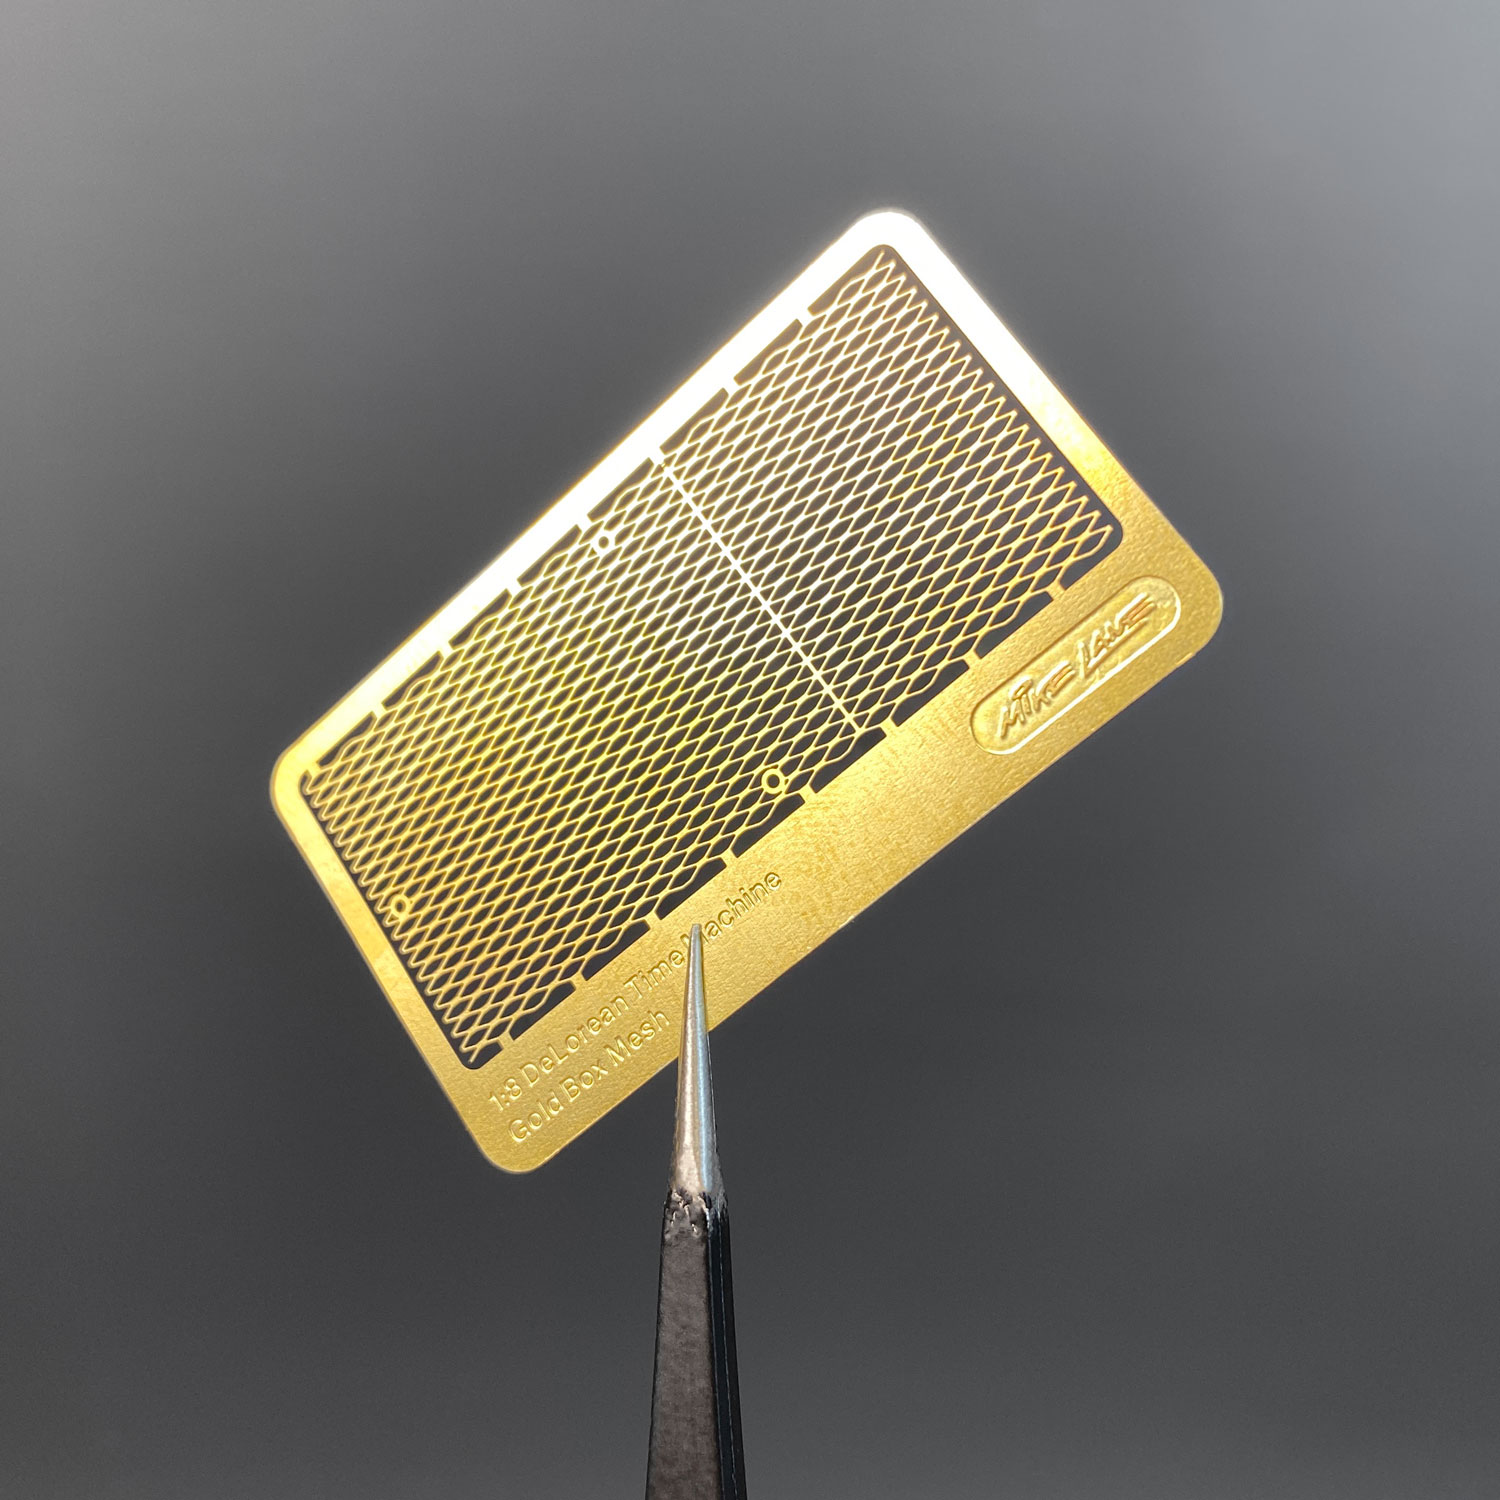
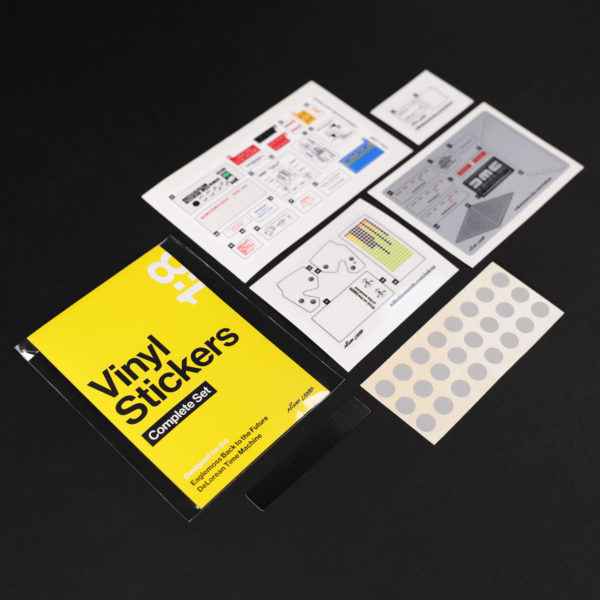
This mod includes precisely designed, finely detailed metal mesh along with rub-on transfers for the front and left sides of the gold box, both accurately matching that of the original hero ‘A’ car, even down to the number or mesh holes!
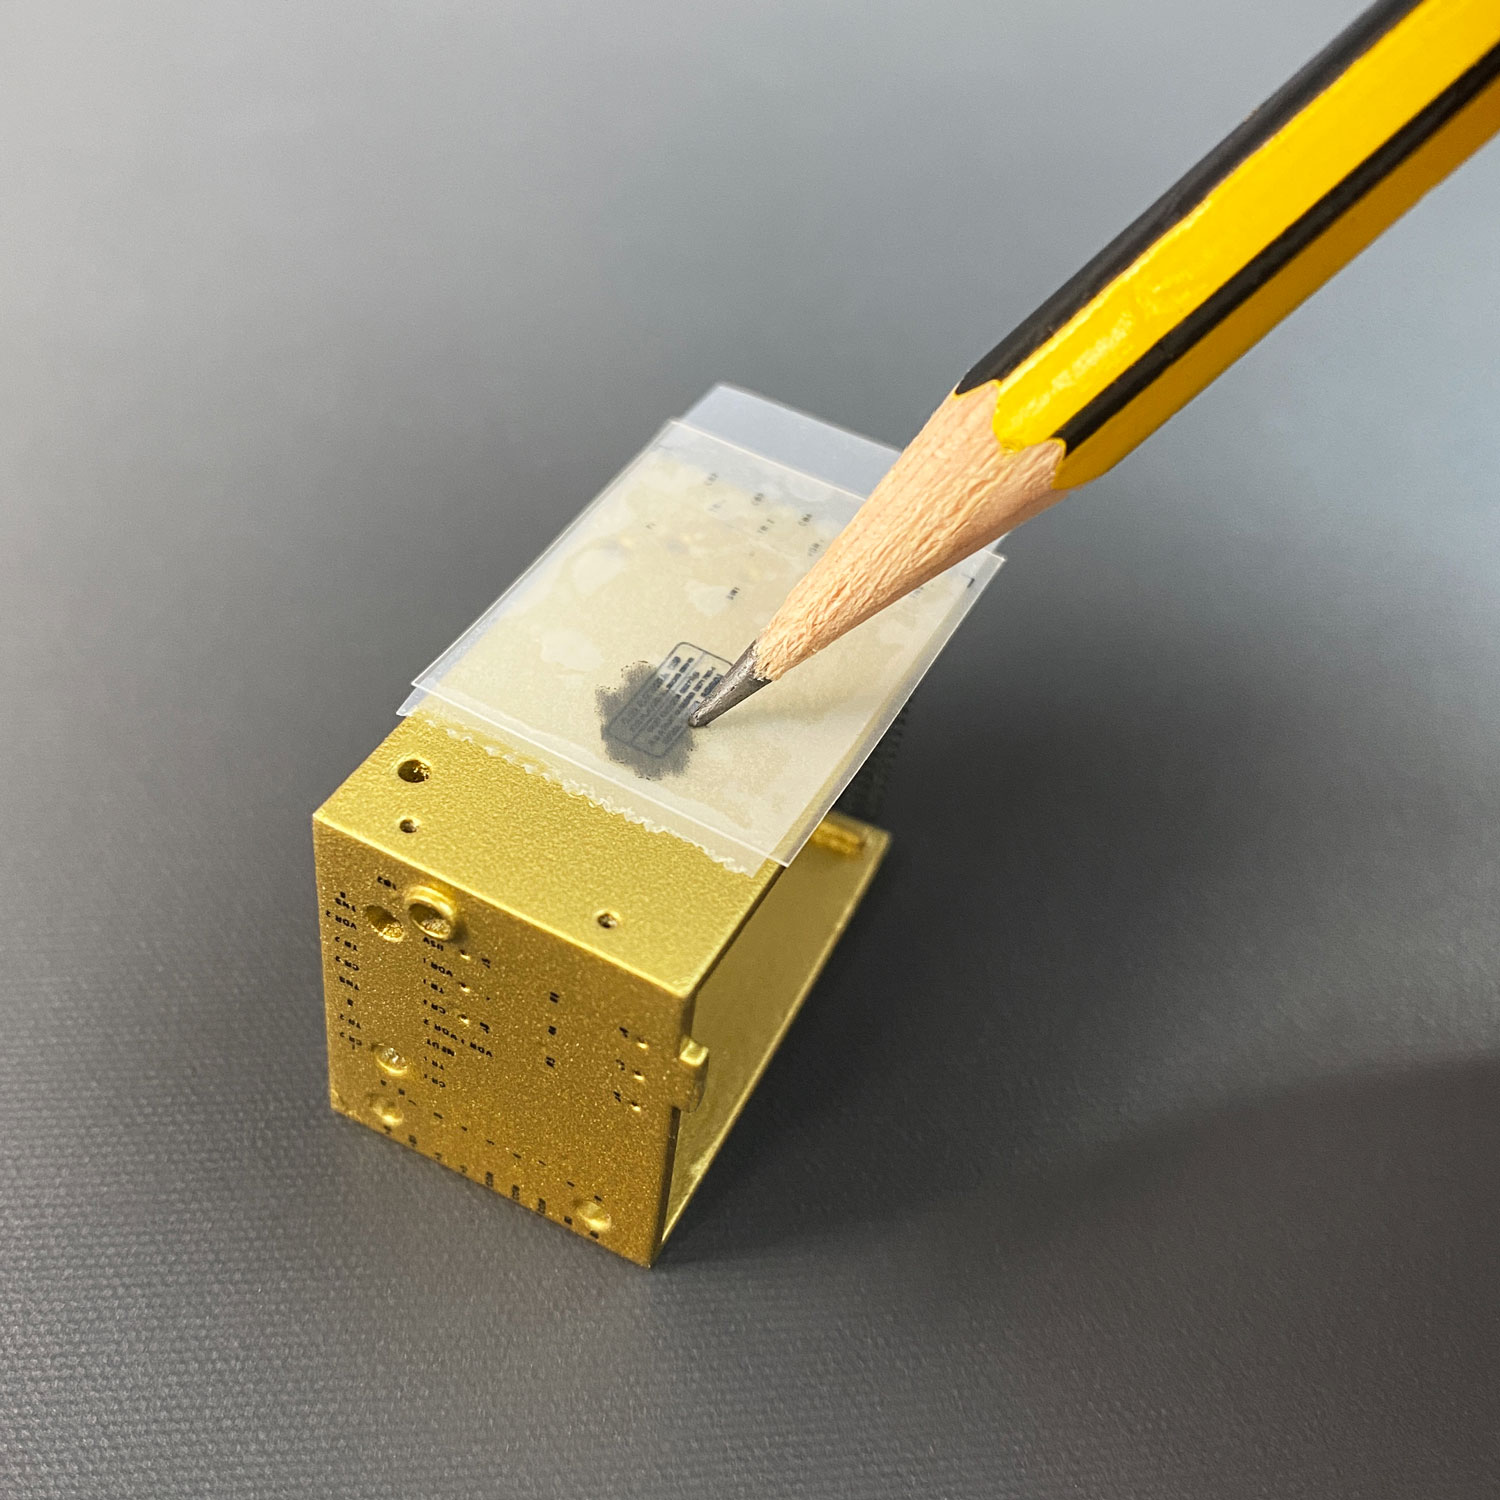
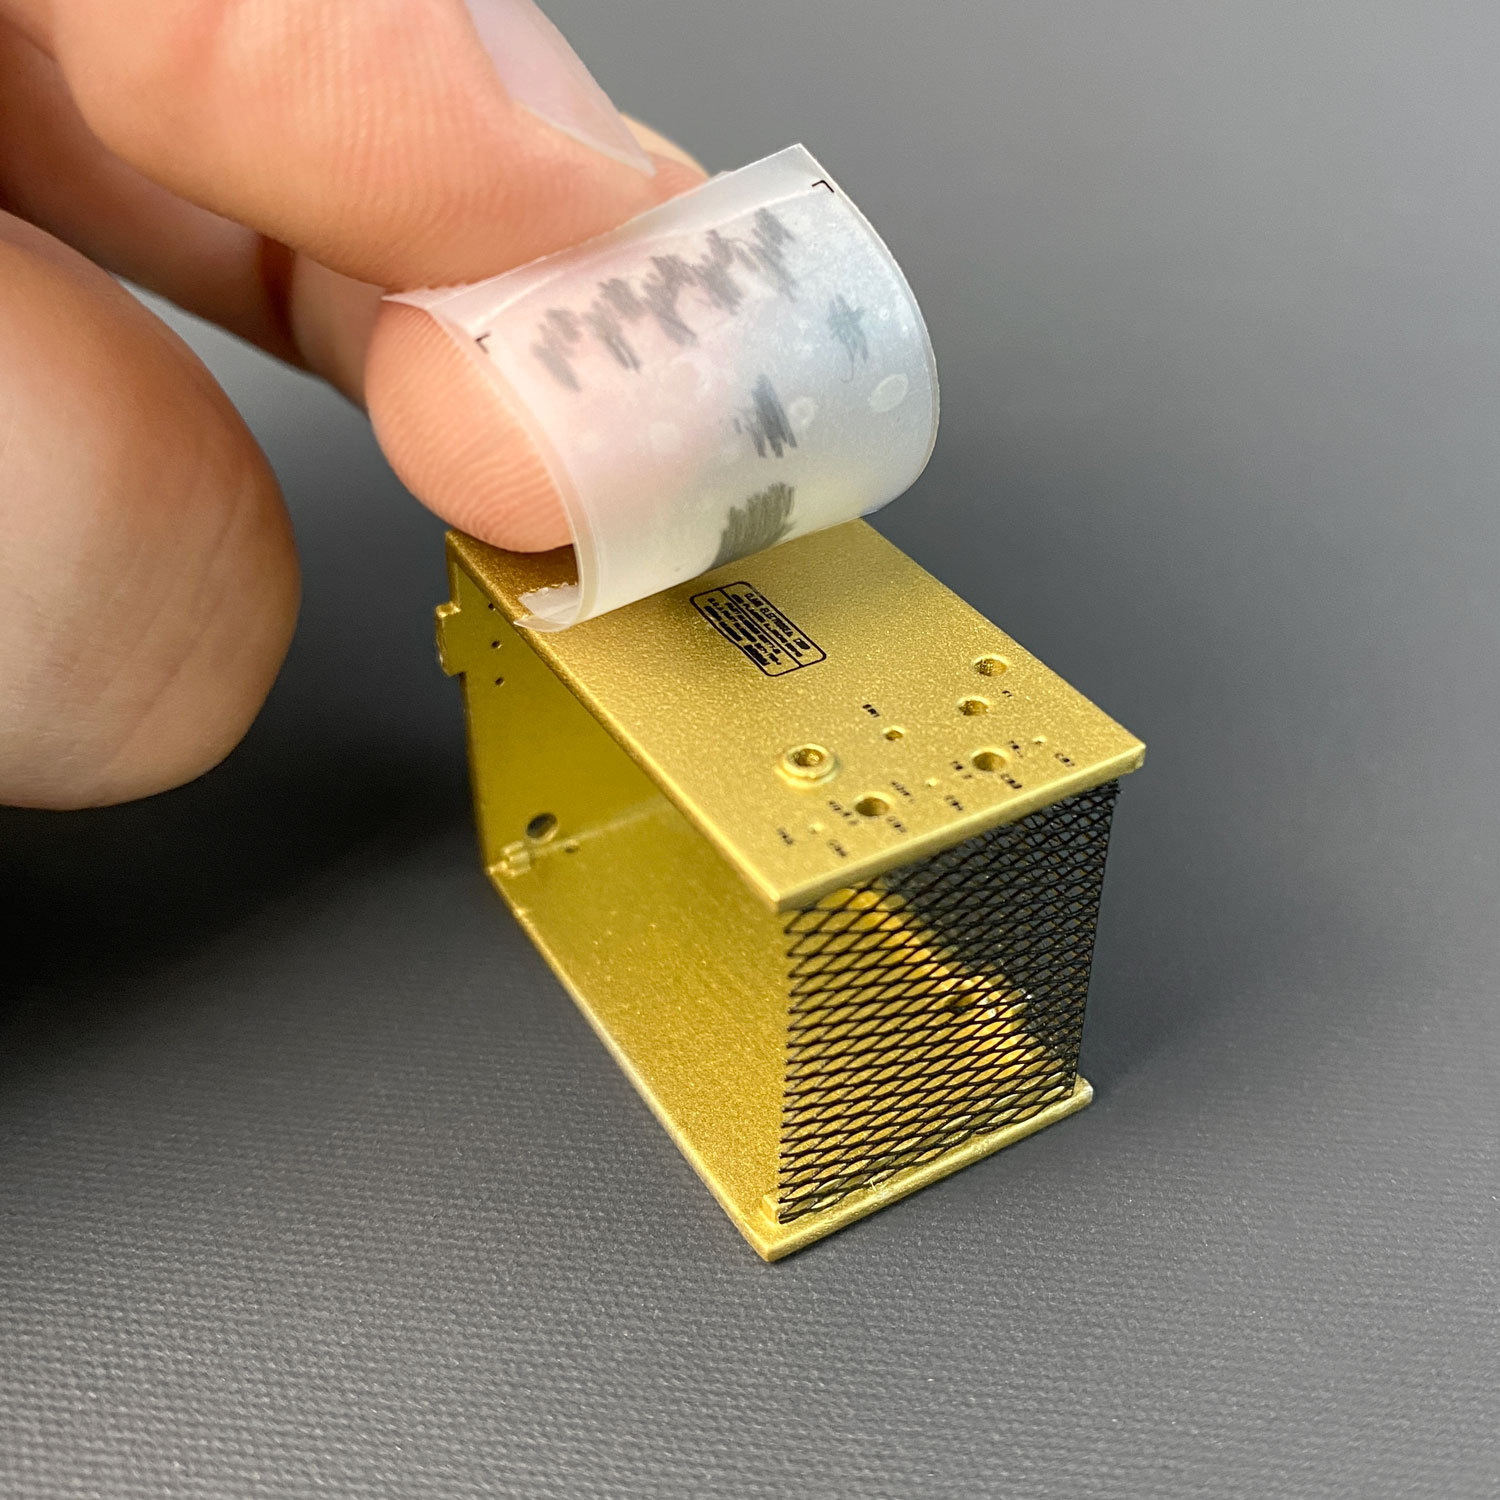
The rub-on transfers are highly detailed and leave no residue or outline, they apply a self-adhesive black ink directly to the surface. This technique gives a much clearer and more authentic look compared to stickers or waterslides.
The mesh and transfers are available to purchase together as a kit or separately, depending on your requirements.
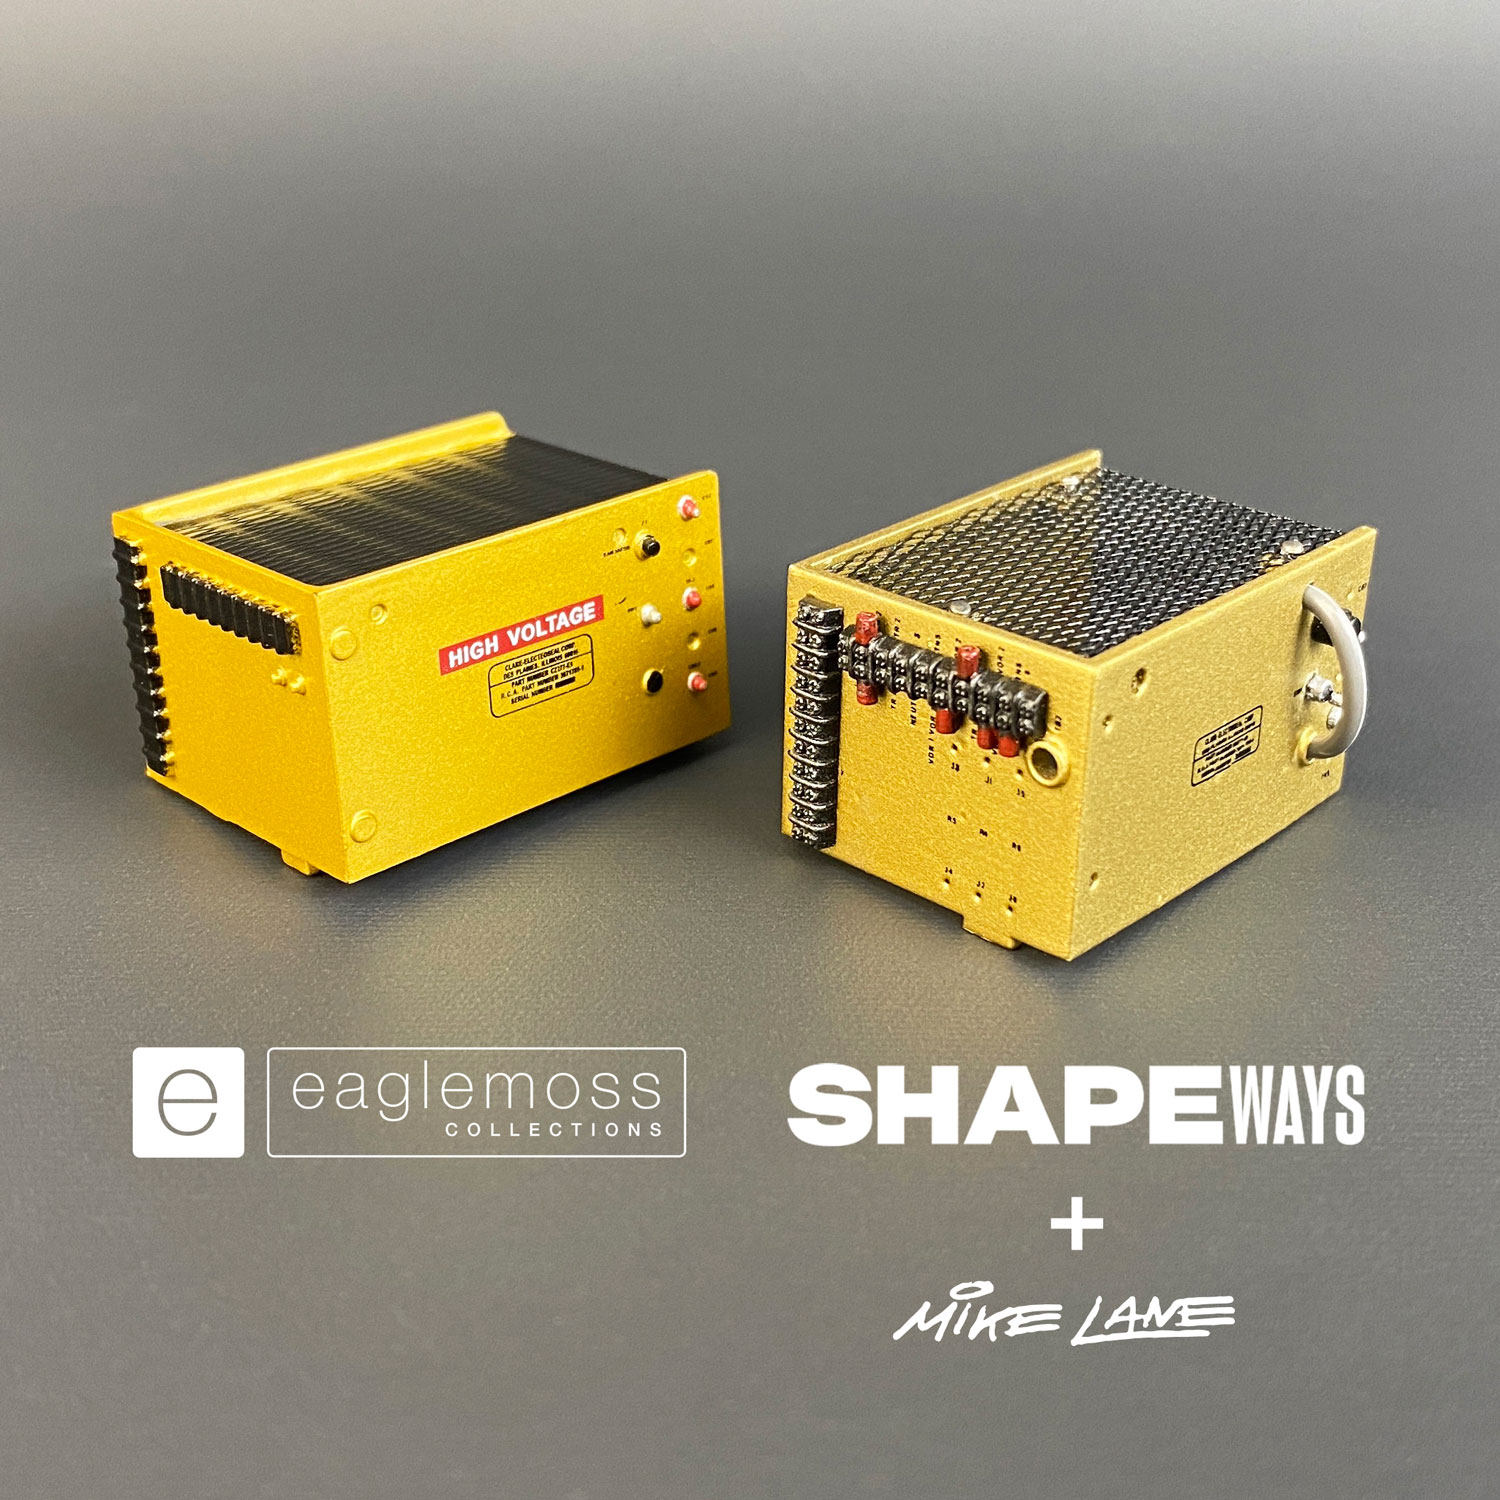
A common complaint with the standard gold box supplied at Issue 43 is that the part is solid, rather than being an open enclosure with real mesh which, in the real DeLorean Time Machine, revealed the inner workings and electronic components.
Together with the updated enclosure available on Shapeways, the mesh and transfers within this kit help to create a far more accurate and highly detailed gold box enclosure true to the original hero ‘A’ car.
The mesh and transfers are easy to install and will instantly transform the enclosure.
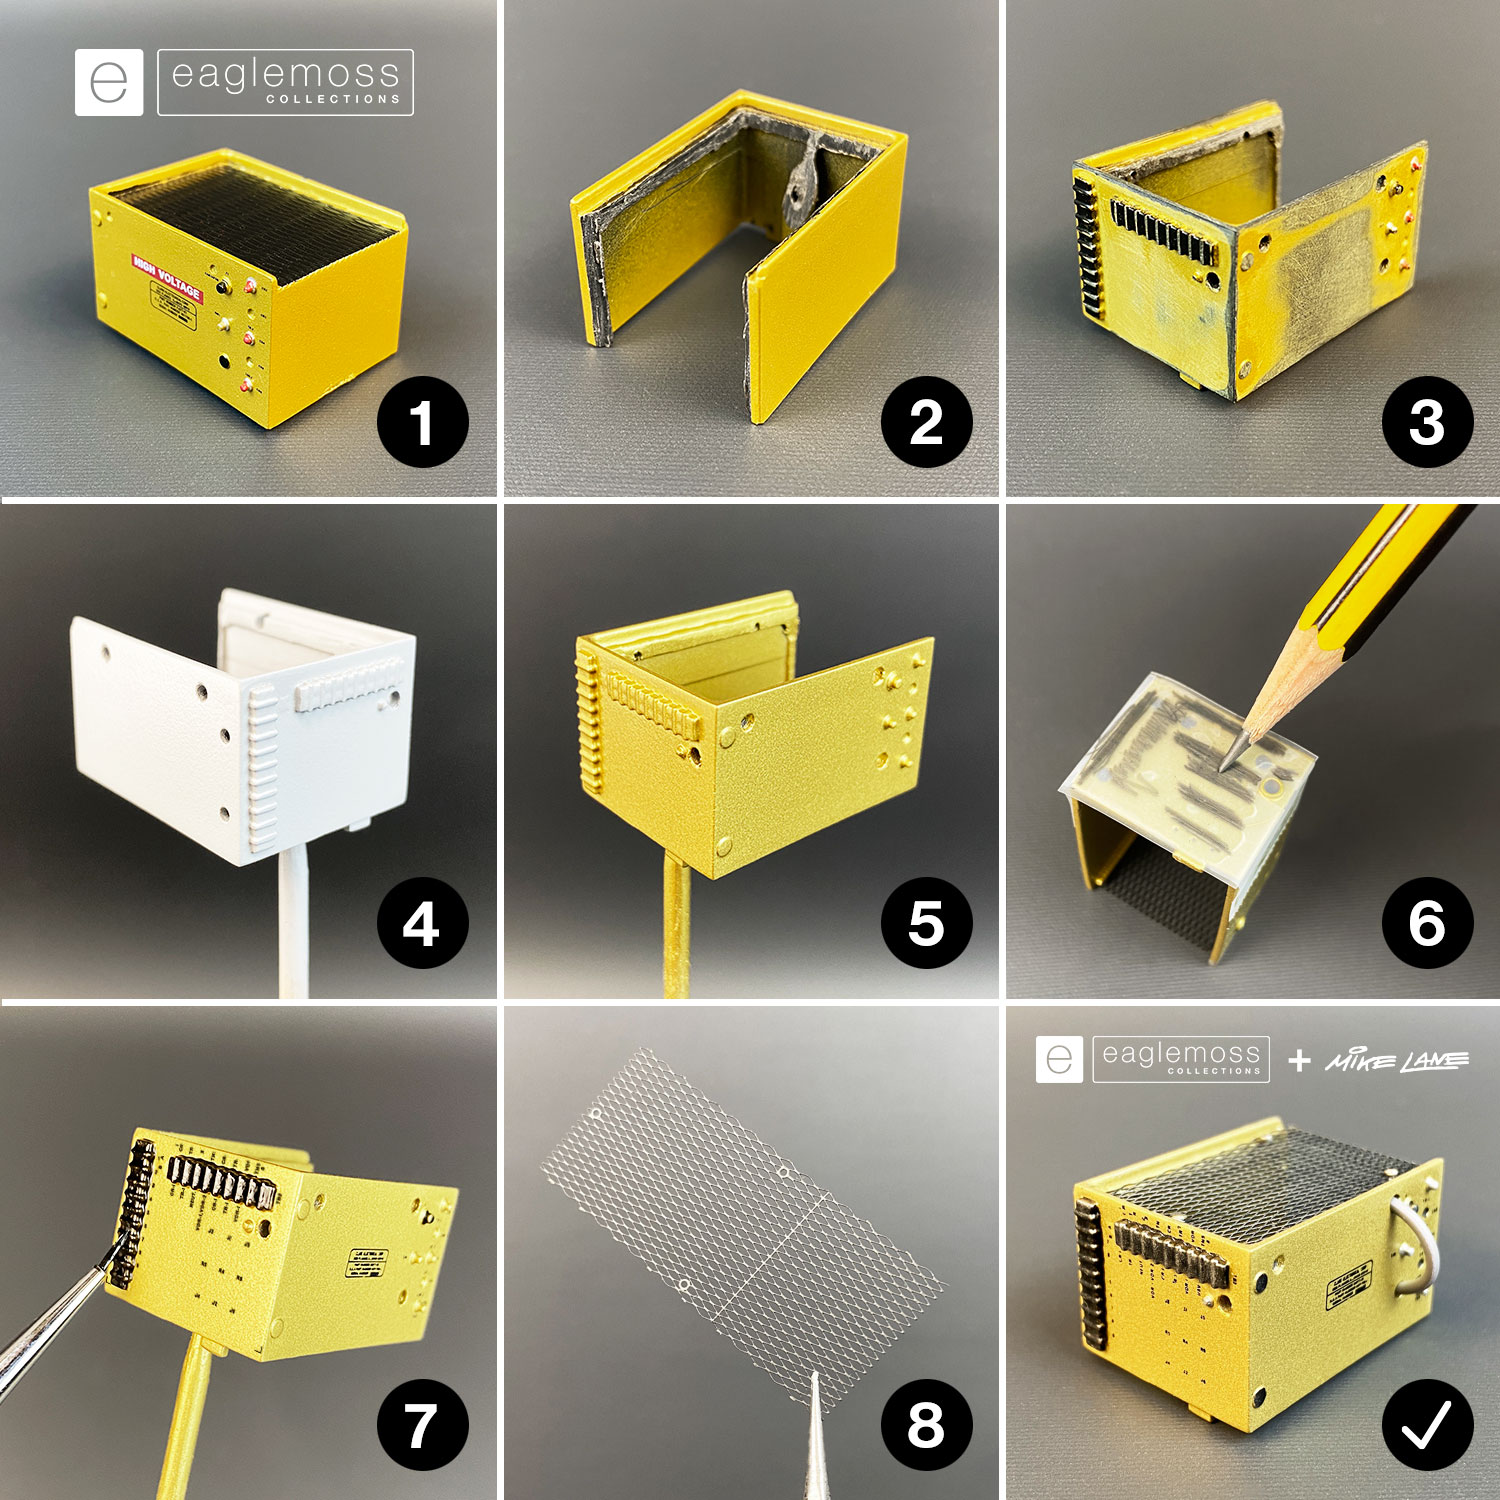
Yes, although it’s a little more challenging as the top and back of the enclosure will need to be cut away. You may also find it a little more difficult to successfully apply all of the transfers due to the protruding parts and lack of space on the Eaglemoss/DeAgostini enclosure compared to the updated Shapeways enclosure.
In the step-by-step photos that you see here showing the transformation of Eaglemoss/DeAgostini enclosure, I used a Dremel to cut away the sections and then filed and sanded the edges. Take care to leave a sufficient internal edge (approx 1.5mm all round) for the mesh to rest on.
So, whilst you can certainly use this mod to improve on the Eaglemoss/DeAgostini part (which in itself is actually quite a fun and rewarding little project), I would recommend purchasing the updated enclosure for use with this kit if you desire an easier and more accurate upgrade. You could of course always give the Eaglemoss box a try first if you wish!
The mesh comes supplied as bare metal so will need painting to achieve the desired ‘matt black’ finish.
I recommend painting the mesh whilst still attached to the frame, the frame acts as a great grip during painting!
For the examples shown in the photos I applied one light coat of Tamiya Fine Surface Primer followed by two light coats of Tamiya TS-6 Matt Black spray paint, on both sides of the mesh. I also applied a light coat of Matt Lacquer to help protect the paint, but this is optional.
I would also recommend weathering the mesh and protruding box elements slightly with the ‘Silver’ and ‘Gun Metal’ shades within the Tamiya Weathering Master kits if available. The parts in the photos you see here have had this treatment applied.
For the gold box itself, I would recommend PlastiKote 1390 FDE Aero Brass as a great colour match for the gold. Less intense than the Eaglemoss/DeAgostini gold, and closer to the original. Alternatively, Tamiya PS-13 Gold would be a good option.
For the screw heads that you see through the top of the mesh I used 0.65mm nickel plated steel sequin pins. Trim them down slightly and they’ll fit right through the holes in the mesh and look just like little metal screw heads.
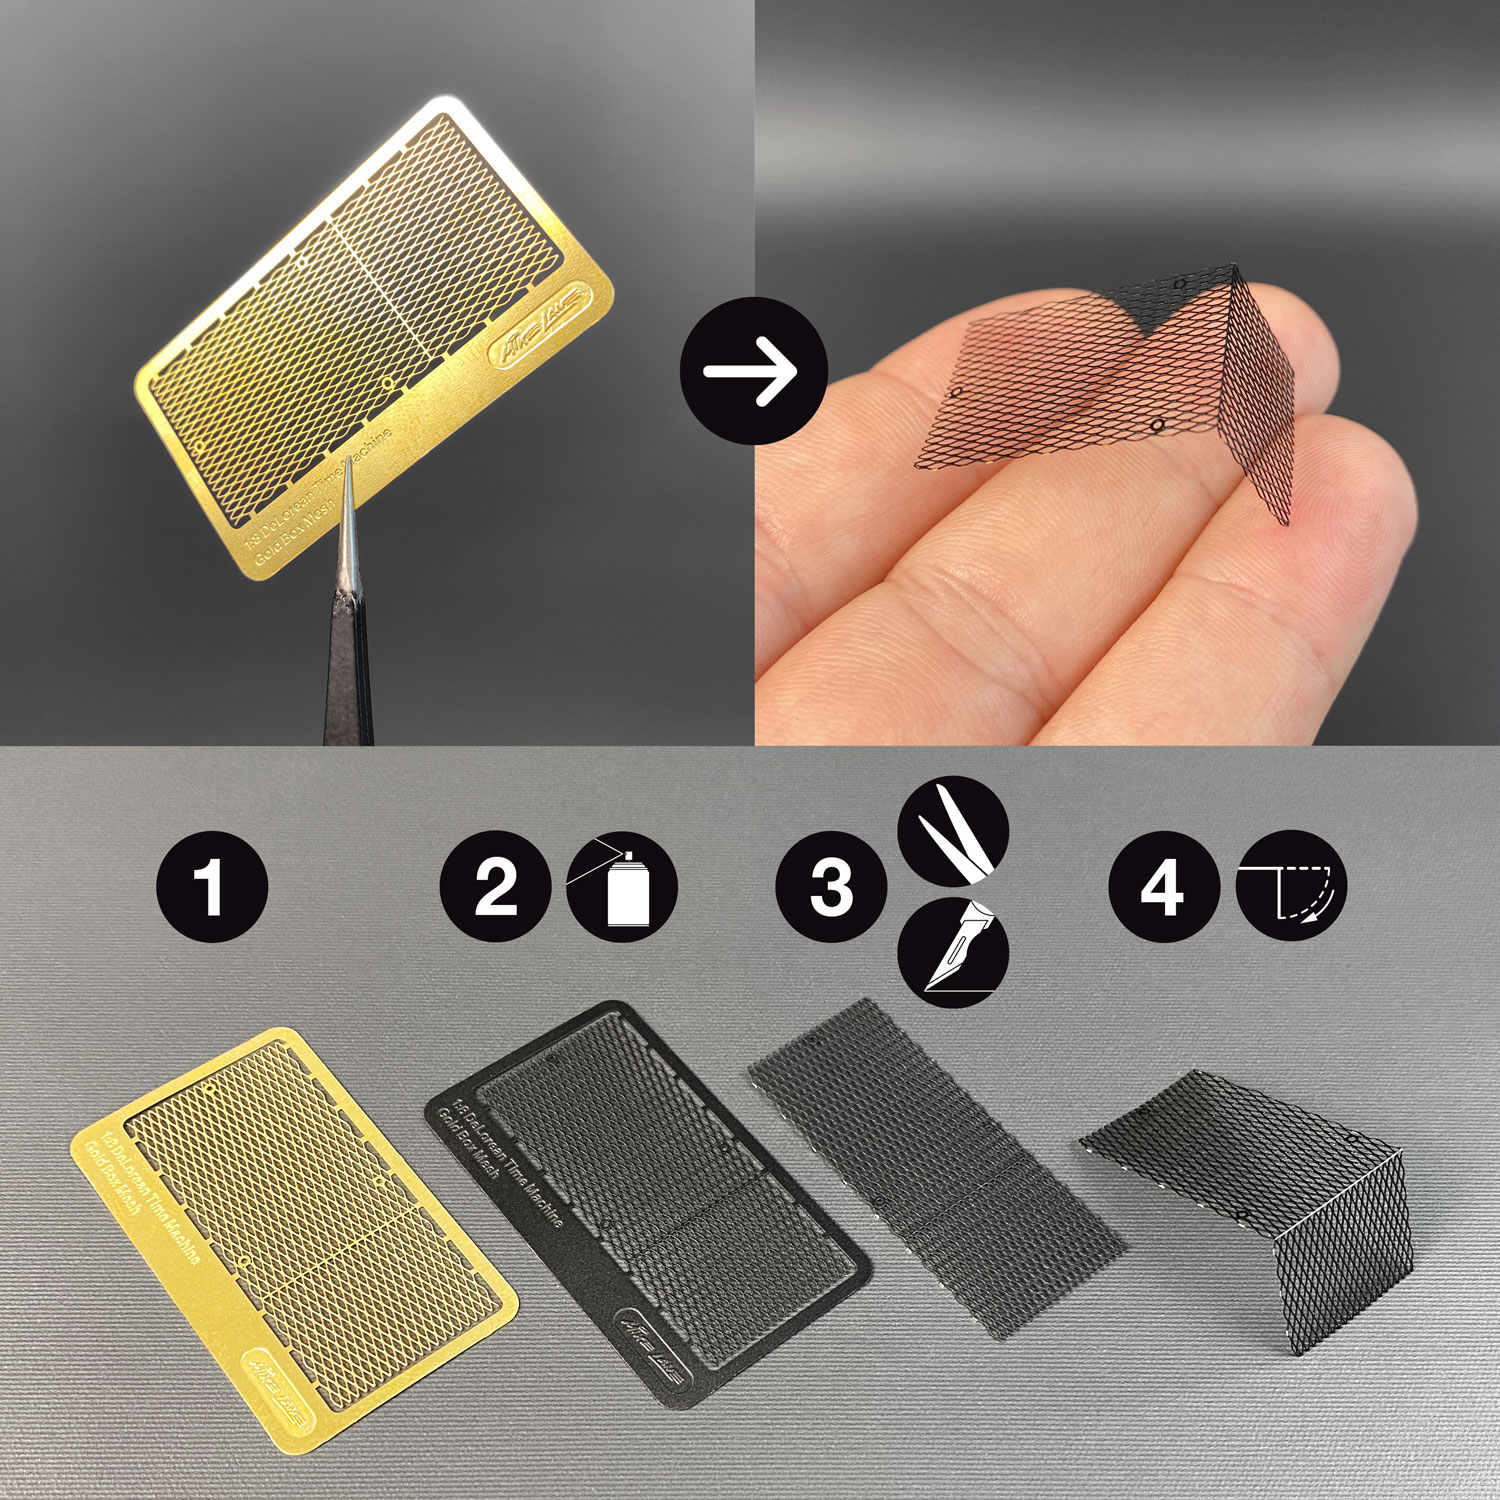
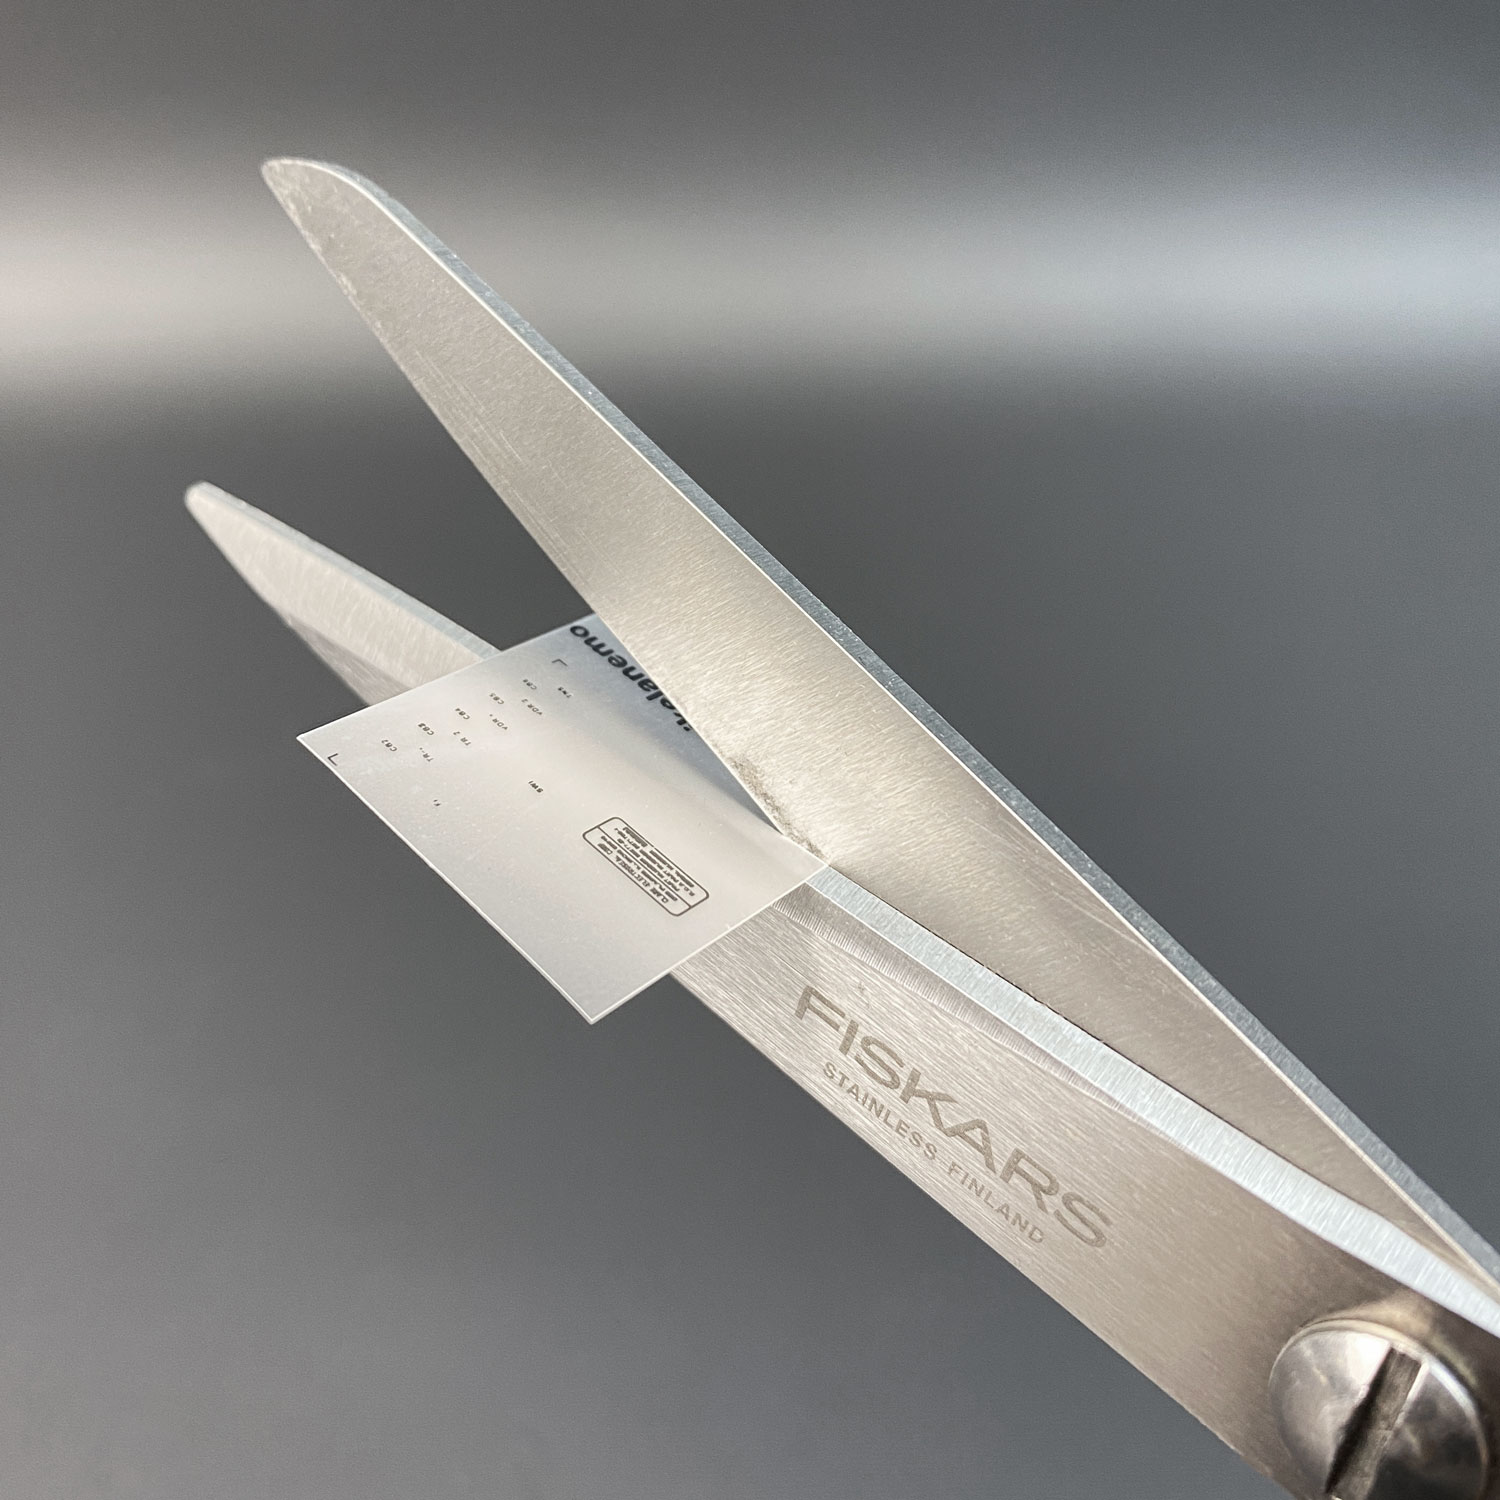
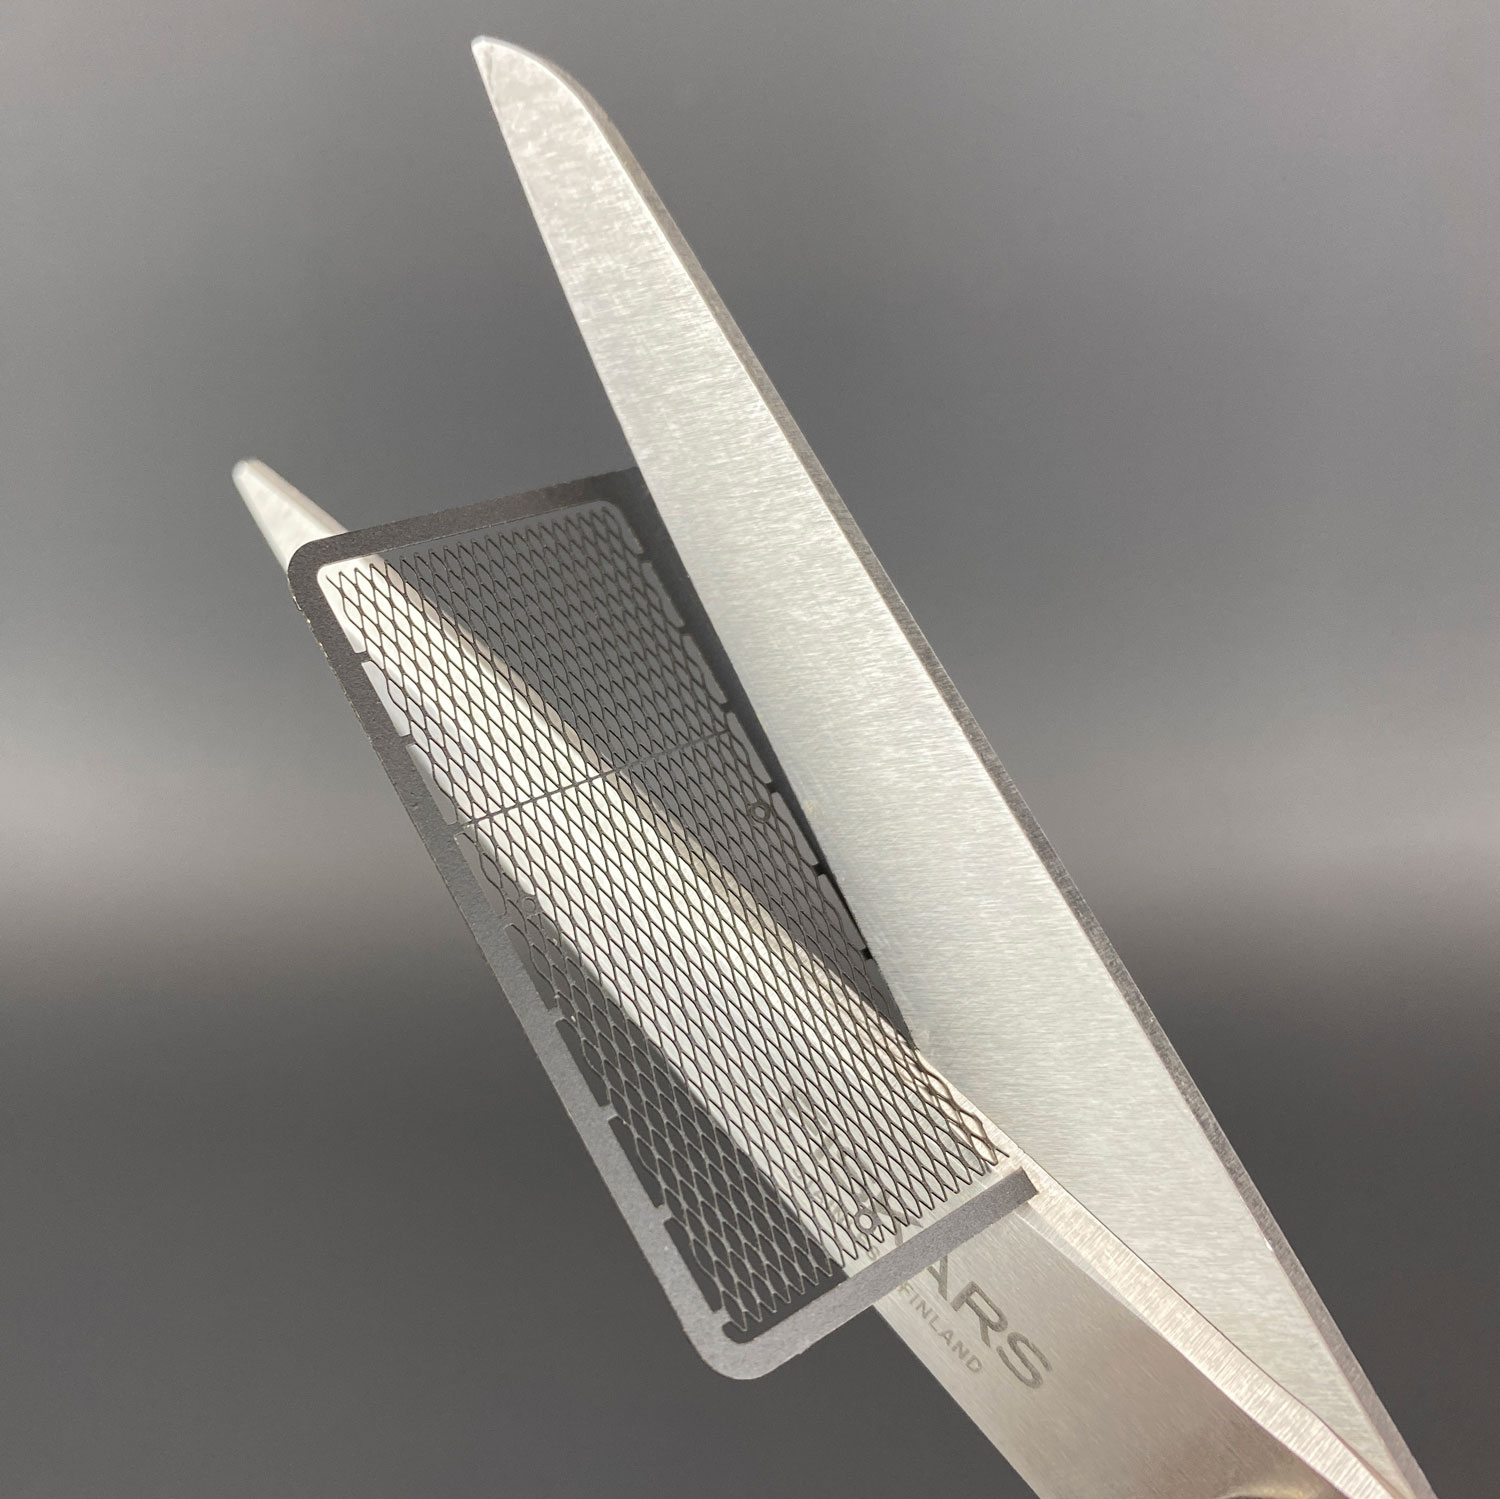
The mesh can released from the frame using a good pair of scissors, or alternatively a modelling blade. The frame includes score lines along the outside of the mesh to guide and ease cutting.
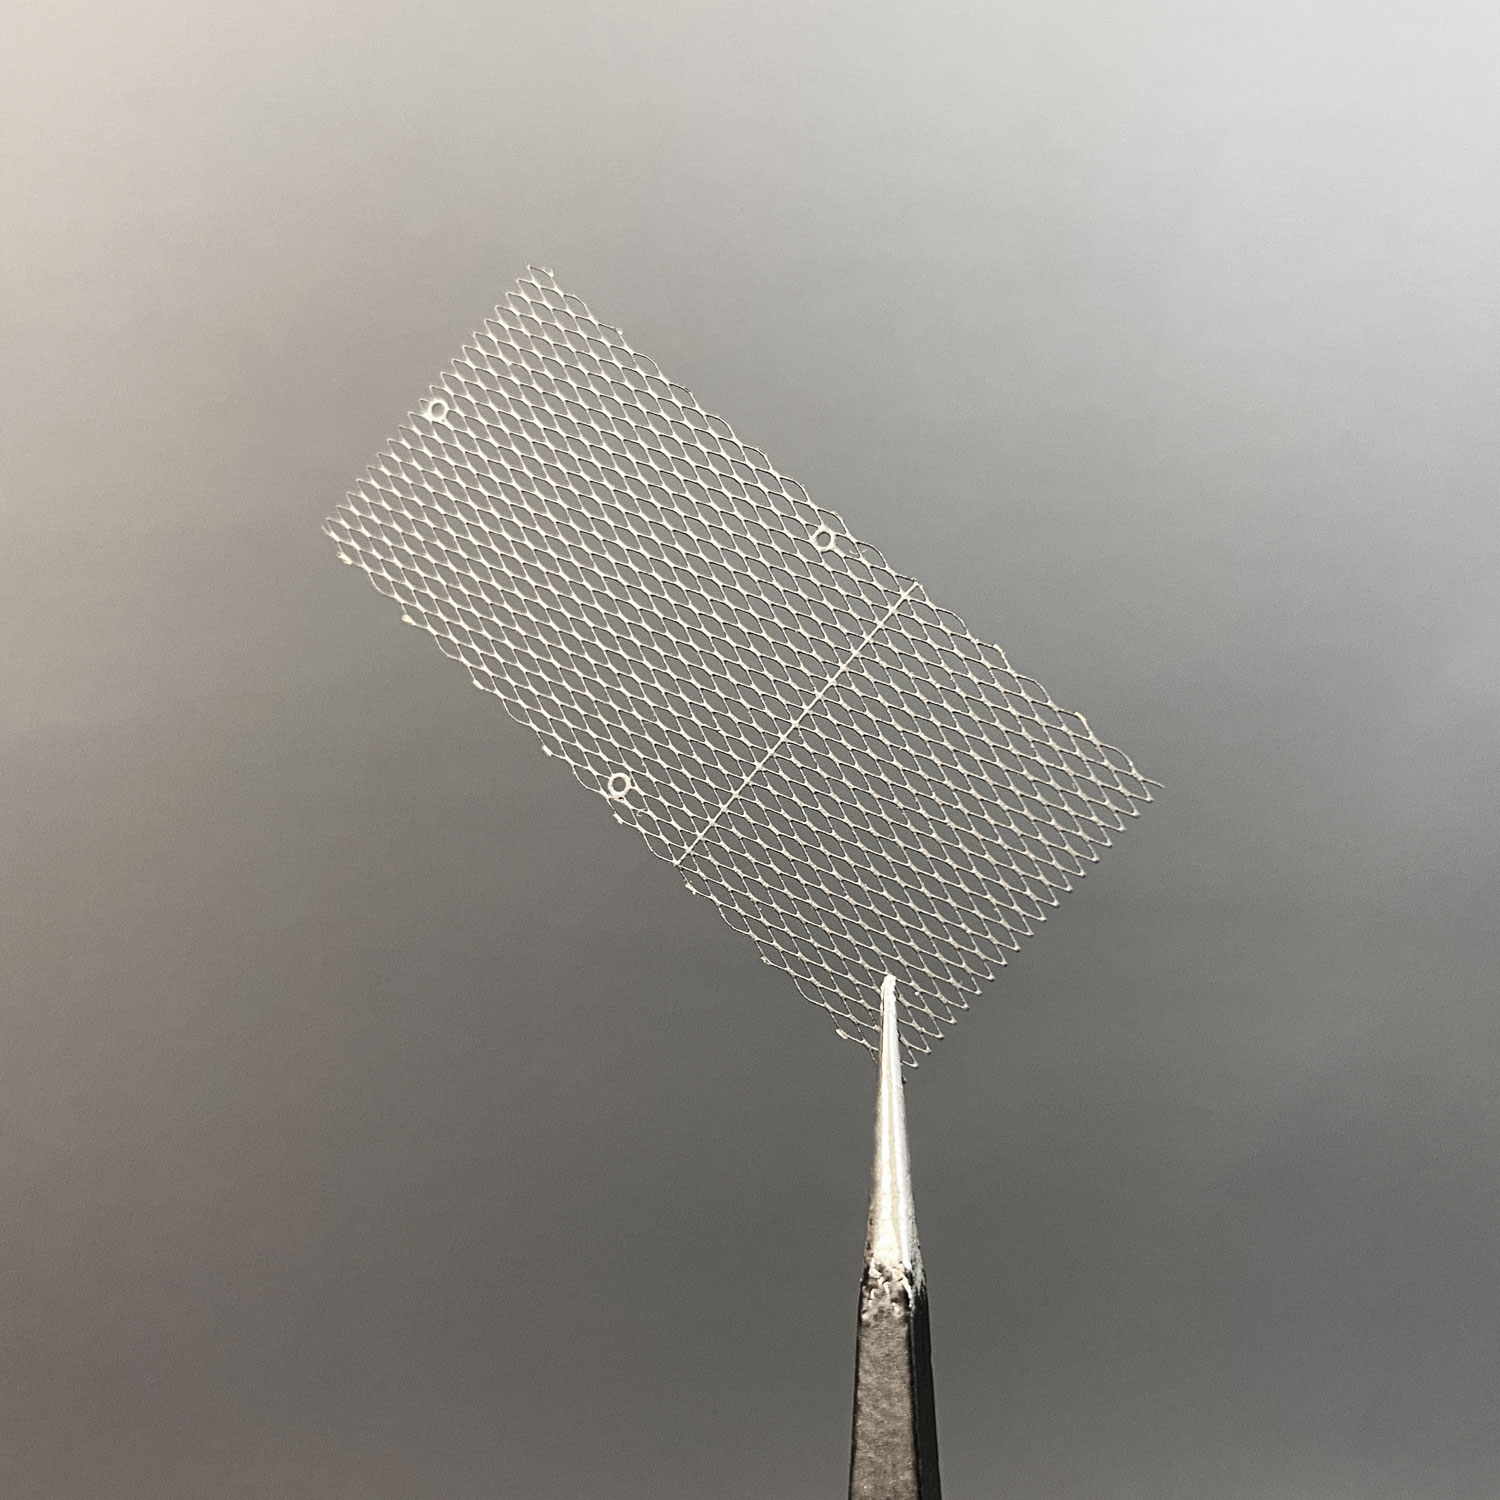
The mesh has a score line on the underside of the fold line, so it will naturally bend easier in one direction. The mesh can be bent easily by hand without too much force to achieve the desired angle.
Compatible with:
This mod includes precisely designed, finely detailed metal mesh along with rub-on transfers for the front and left sides of the gold box, both accurately matching that of the original hero ‘A’ car, even down to the number or mesh holes!
The rub-on transfers are highly detailed and leave no residue or outline, they apply a self-adhesive black ink directly to the surface. This technique gives a much clearer and more authentic look compared to stickers or waterslides.
The mesh and transfers are available to purchase together as a kit or separately, depending on your requirements.
A common complaint with the standard gold box supplied at Issue 43 is that the part is solid, rather than being an open enclosure with real mesh which, in the real DeLorean Time Machine, revealed the inner workings and electronic components.
Together with the updated enclosure available on Shapeways, the mesh and transfers within this kit help to create a far more accurate and highly detailed gold box enclosure true to the original hero ‘A’ car.
The mesh and transfers are easy to install and will instantly transform the enclosure.
Yes, although it’s a little more challenging as the top and back of the enclosure will need to be cut away. You may also find it a little more difficult to successfully apply all of the transfers due to the protruding parts and lack of space on the Eaglemoss/DeAgostini enclosure compared to the updated Shapeways enclosure.
In the step-by-step photos that you see here showing the transformation of Eaglemoss/DeAgostini enclosure, I used a Dremel to cut away the sections and then filed and sanded the edges. Take care to leave a sufficient internal edge (approx 1.5mm all round) for the mesh to rest on.
So, whilst you can certainly use this mod to improve on the Eaglemoss/DeAgostini part (which in itself is actually quite a fun and rewarding little project), I would recommend purchasing the updated enclosure for use with this kit if you desire an easier and more accurate upgrade. You could of course always give the Eaglemoss box a try first if you wish!
The mesh comes supplied as bare metal so will need painting to achieve the desired ‘matt black’ finish.
I recommend painting the mesh whilst still attached to the frame, the frame acts as a great grip during painting!
For the examples shown in the photos I applied one light coat of Tamiya Fine Surface Primer followed by two light coats of Tamiya TS-6 Matt Black spray paint, on both sides of the mesh. I also applied a light coat of Matt Lacquer to help protect the paint, but this is optional.
I would also recommend weathering the mesh and protruding box elements slightly with the ‘Silver’ and ‘Gun Metal’ shades within the Tamiya Weathering Master kits if available. The parts in the photos you see here have had this treatment applied.
For the gold box itself, I would recommend PlastiKote 1390 FDE Aero Brass as a great colour match for the gold. Less intense than the Eaglemoss/DeAgostini gold, and closer to the original. Alternatively, Tamiya PS-13 Gold would be a good option.
For the screw heads that you see through the top of the mesh I used 0.65mm nickel plated steel sequin pins. Trim them down slightly and they’ll fit right through the holes in the mesh and look just like little metal screw heads.
The mesh can released from the frame using a good pair of scissors, or alternatively a modelling blade. The frame includes score lines along the outside of the mesh to guide and ease cutting.
The mesh has a score line on the underside of the fold line, so it will naturally bend easier in one direction. The mesh can be bent easily by hand without too much force to achieve the desired angle.


You must be logged in to post a review.
Rick Gregory (verified owner) –
Mike has done it again! These transfers are a must have; but then again, all of Mike's mods are a must have. I totally replaced the stock part with the 3D print from Gavin Millar, kicking it up another notch by getting Adrian Dinca's #3D internal parts that together make up the best Gold Box you can get! Highly recommend getting all three mods to create what Eaglemoss should have done in the first place!
I agree with another review: Drop the 5-individual starts and just have a 5-Star selection, because there really is no other logical choice here!
Brian MacNutt (verified owner) –
I think that they should take away the first four stars, and just leave the "5 Star" star. At least, that's my opinion! Great set, Mike, ya done great! And another fix of those yummy gummies. Feeling good on all levels! Thanks!
Jeffrey Russell (verified owner) –
The mod looks great looks a lot better than the one on the eaglemoss build. great job Mike