Designed for Stage 80, 91 and 102 of the Build the Ghostbusters Ecto-1 by Eaglemoss. View build planner
Installation instructions
Ahead of installation, I would highly recommend watching the walkthrough videos below. This will help to ensure you get the perfect finish and will avoid any potential slip-ups.
Fully illustrated, step-by-step instructions are also provided with the kit.
Removing the pre-applied door stickers
For some of us, issues 91 and 102 came with the door stickers pre-applied to the doors.
Thankfully these stickers can be removed aided with a little heat from a hairdryer or steamed off with a kettle, and then cleaning any remaining sticky marks with some Isopropyl Alcohol Cleaner and soft, microfibre cloths.
To avoid scratching your door during the cleaning process, only use soft microfibre cloths, avoid ‘scrubbing’ in small areas and clean in as little number of passes as possible across the entire door. I would recommend applying the alcohol to the doors with wet wipes, this keeps the door wet as you clean and reduces the risk of scratching. Avoid using dry paper towels at all costs! Keeping the door wet during the cleaning process will give you much better results and will avoid damaging the doors finish.
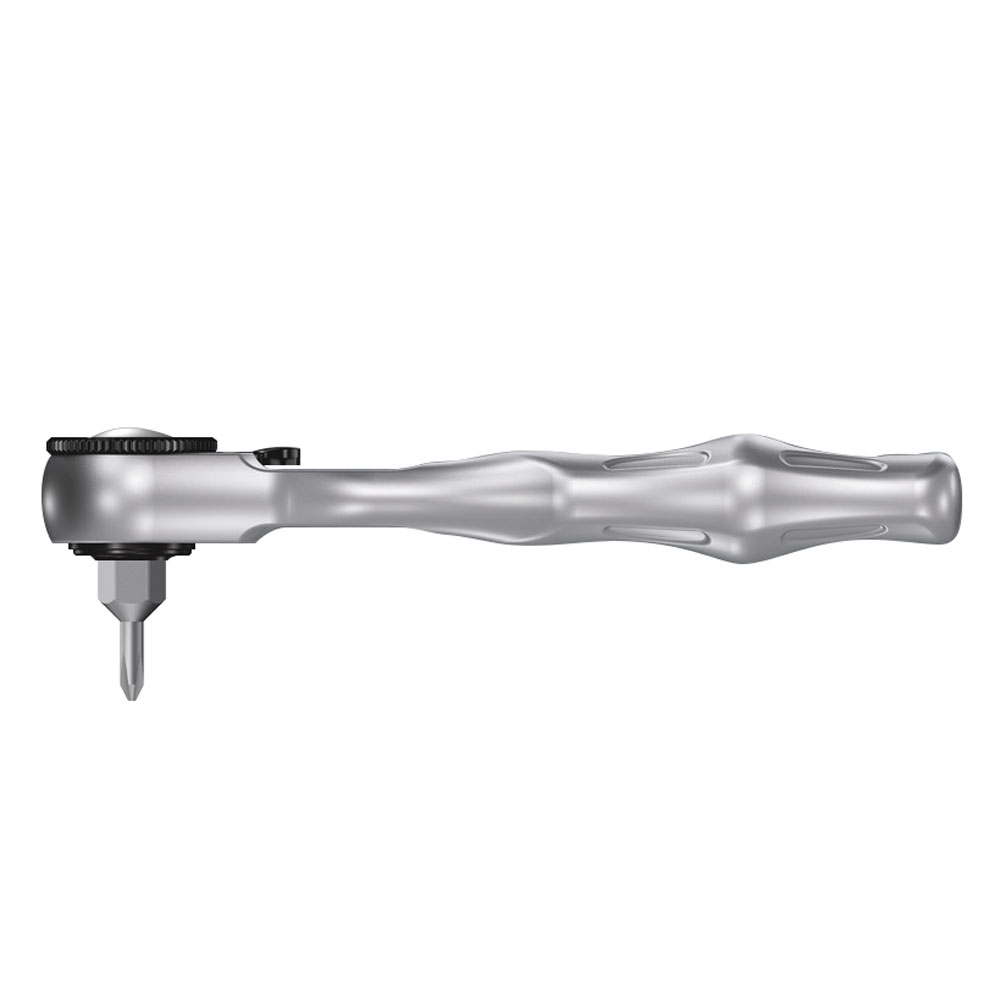
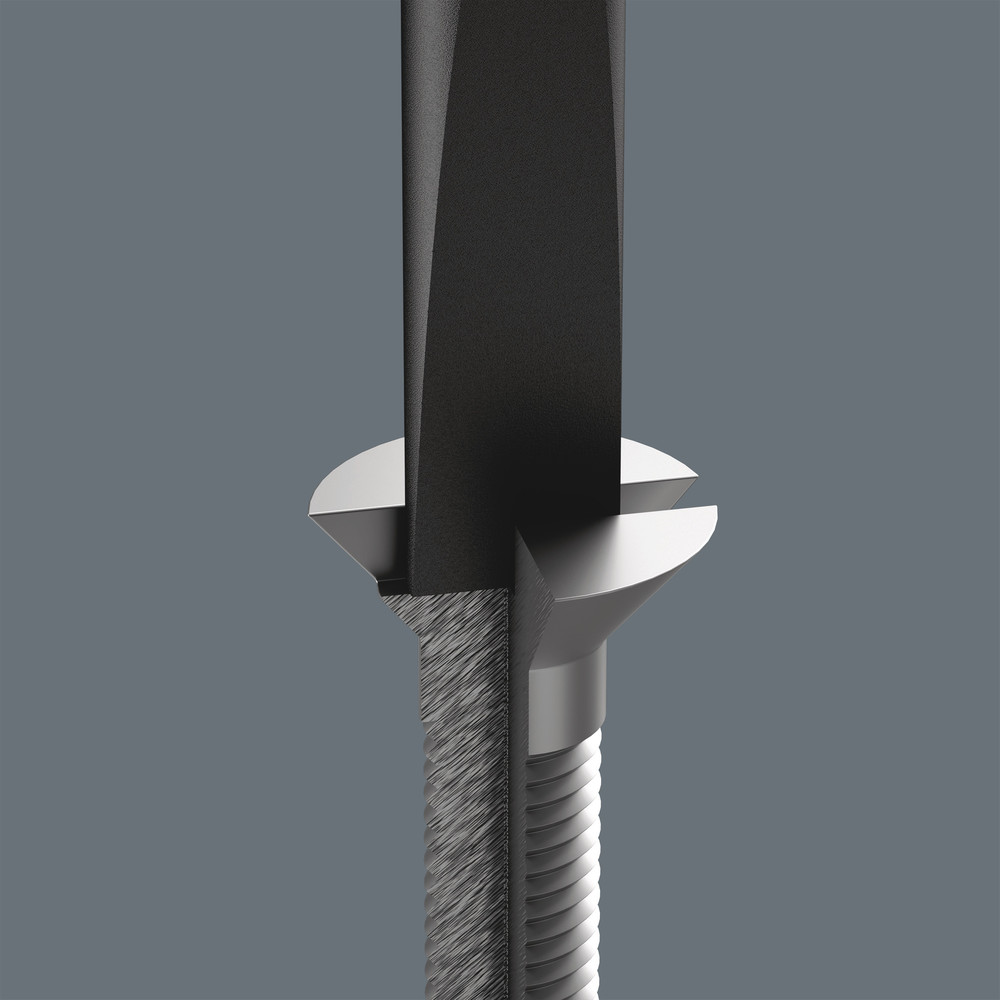
You will also notice small positioning marks printed on the door beneath the stickers, but again, these can be removed using alcohol cleaner together with the spudger tool provided within this kit. You find some of these marks are more stubborn than others, but with some patience and frequent soaking of alcohol cleaner between passes they will remove. When using the spudger tool, ensure the door is wet with alcohol to avoid scratching the surface.
Once you are finished, I would recommend cleaning the door with a final pass of alcohol cleaner quickly followed by a pass of warm water to remove any remaining residue from the alcohol cleaner, and then lightly dried and polished with a microfibre cloth.
Rub-on Transfer Installation Video:
https://youtu.be/IGQOy5nW614&rel=0
Vinyl Sticker Installation Video:
https://youtu.be/WnkEDraqT5E&rel=0
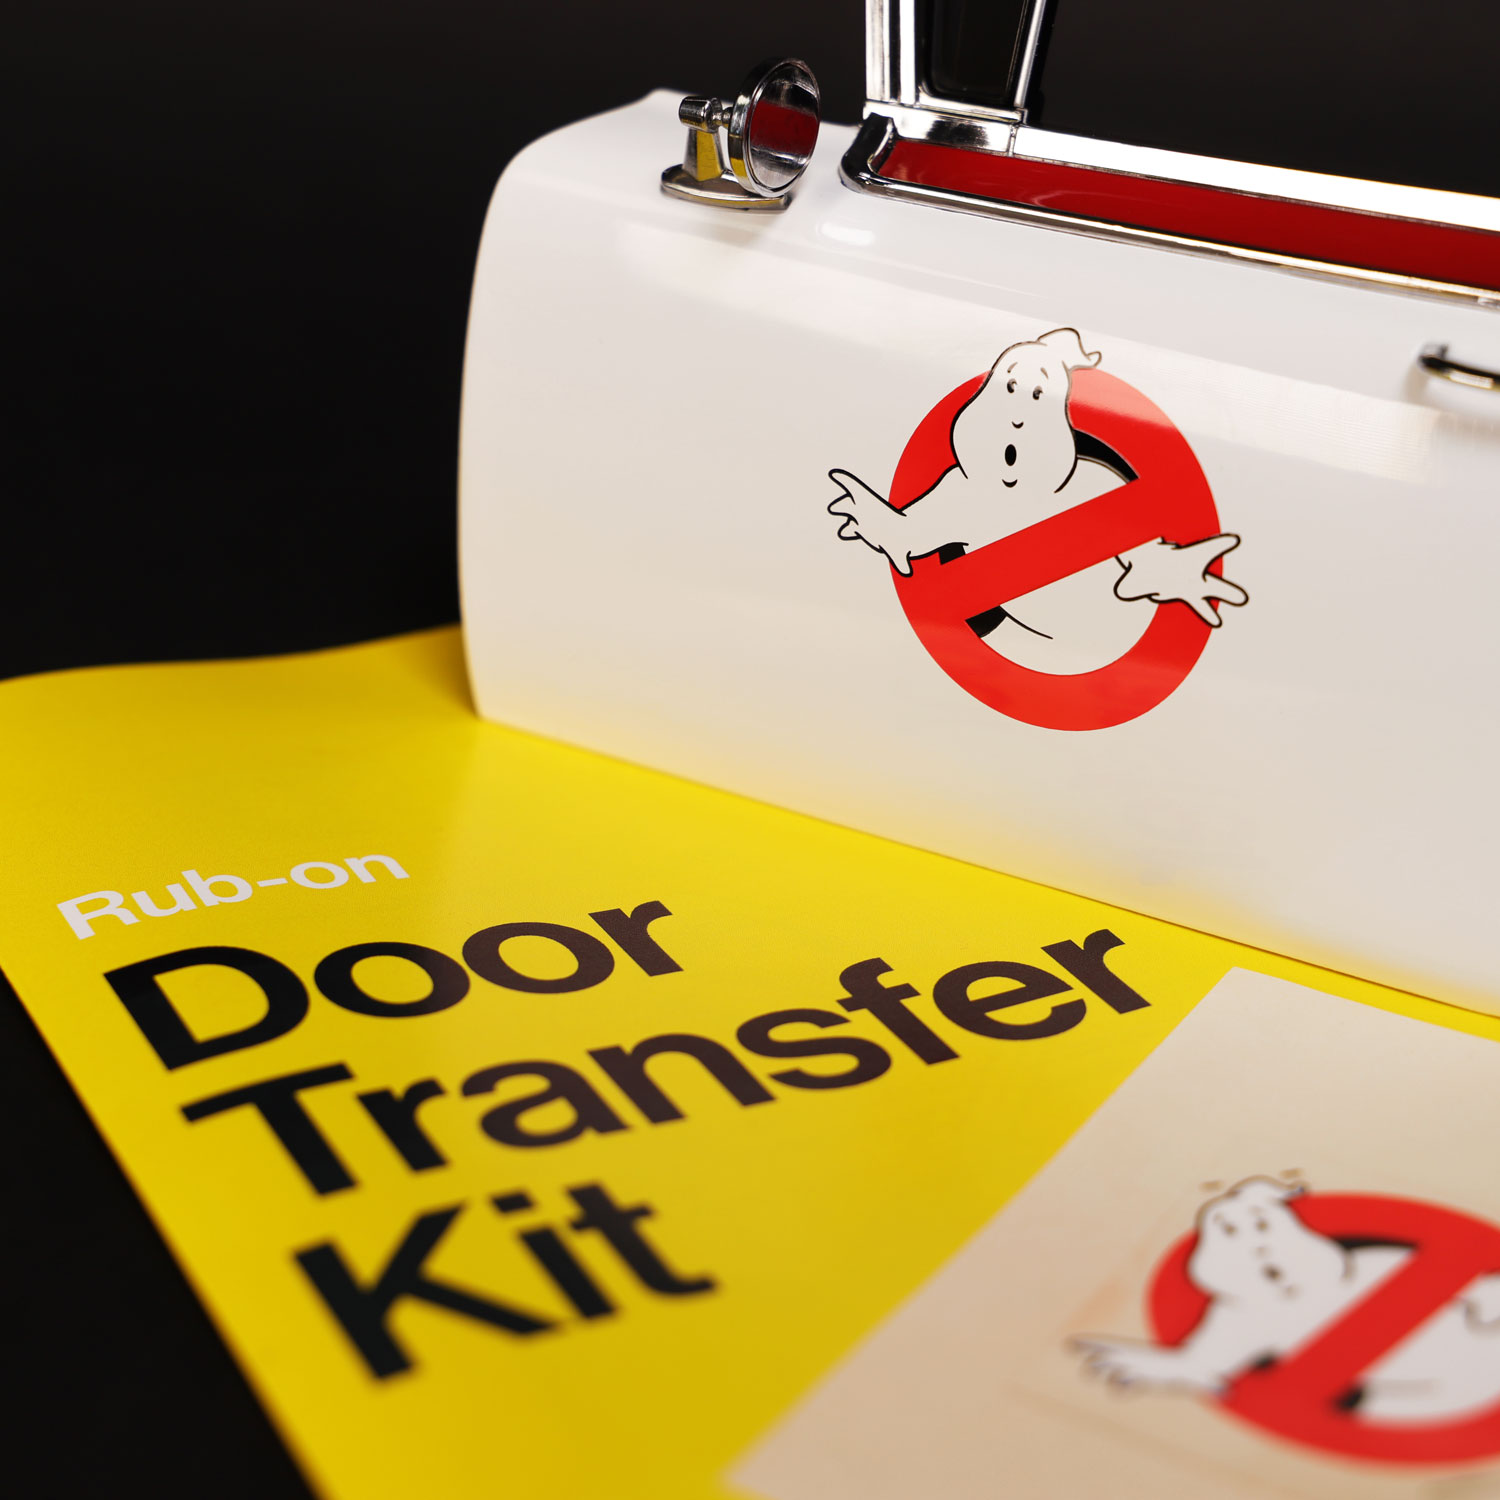
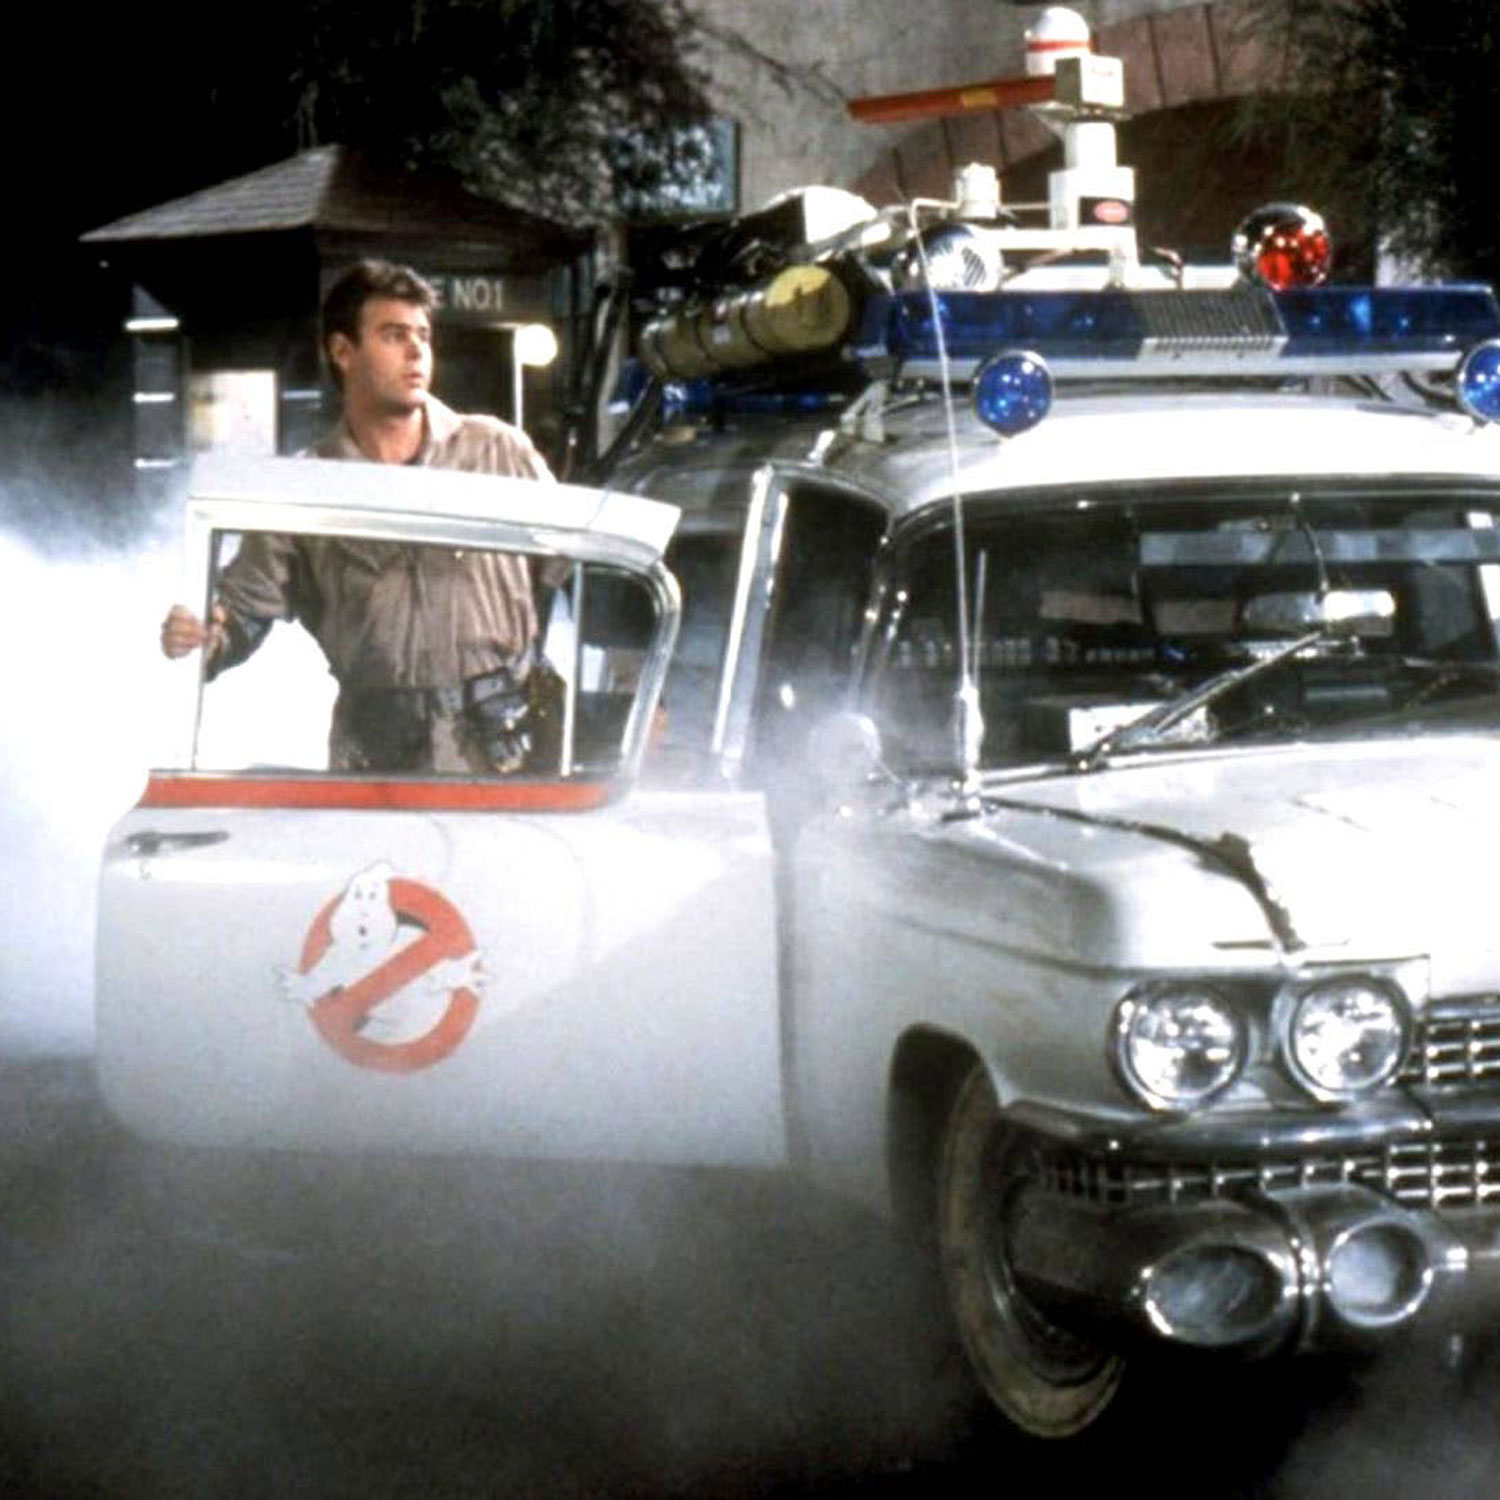
Available as either rub-on transfers featuring specialist transferable Pantone® inks, or as vinyl stickers, these easy-to-use kits replace and upgrade the ‘No-Ghost’ stickers provided with the model – correcting the scale and providing a higher quality and more authentic finish.
These kits include everything you need to replace the oversized stickers provided with the Eaglemoss Ecto-1 model. At the same time, they add an altogether higher quality finish and match the doors of your Ecto-1 perfectly to how they looked in the 1984 Ghostbusters movie.
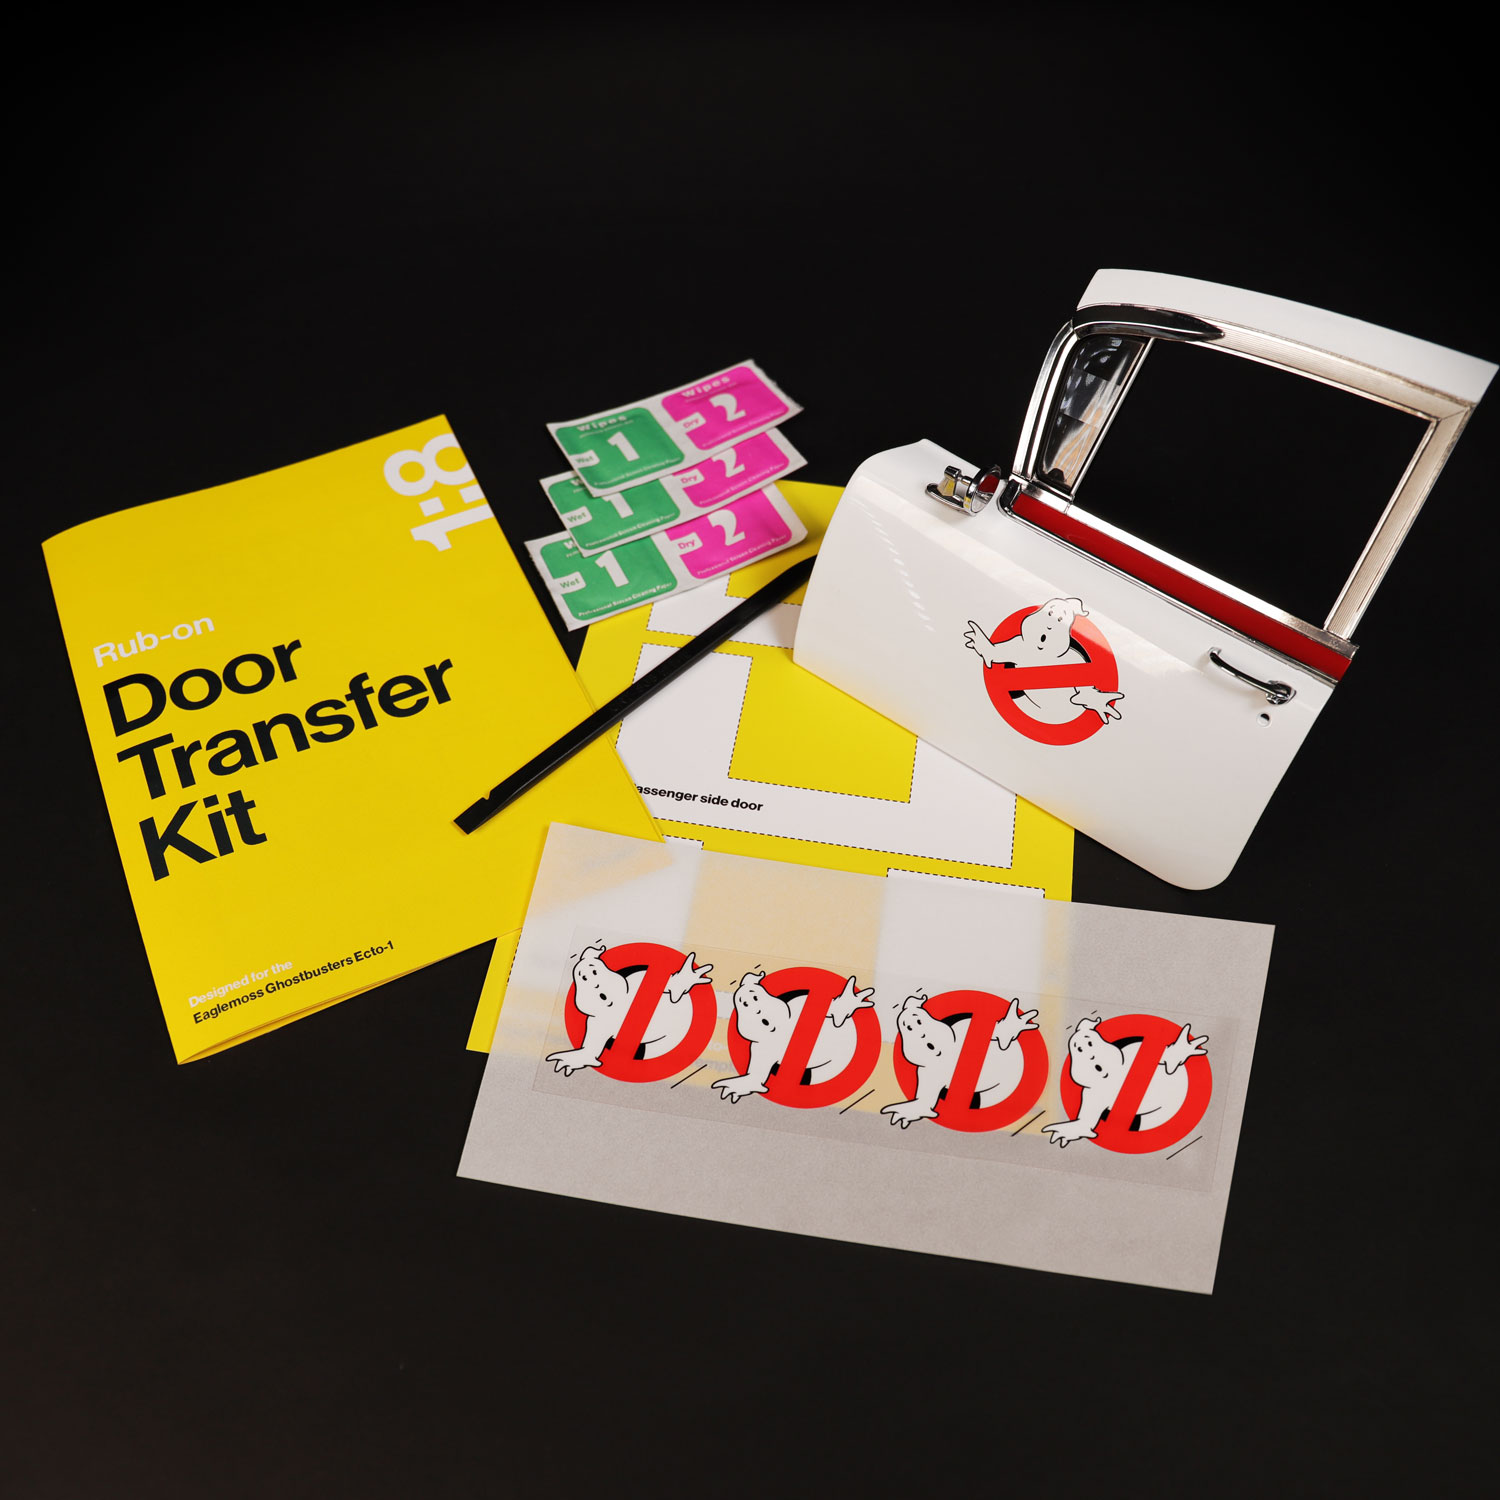
Installation is easy, with positioning templates, a spudger tool for application and fully illustrated instructions provided to take you through each step. The whole process takes no more than a few minutes for each door.
The vinyl stickers are as easy as peel and stick, and the rub-on transfers (not to be confused with waterslides, yuk!), are a premium product with the unique ability to transfer self-adhesive Pantone® inks directly to the surface, looking as if the design has been printed directly onto the model part! Application of the rub-on transfers is a little more technical but gives a better finish compared to stickers.
The ‘No-Ghost’ logos are available in two styles, each accurately matching different versions of the Ecto-1 from the Ghostbusters and Ghostbusters II movies where the logo varies slightly (see Logo styles – Traditional vs Sedgewick below for an explanation).
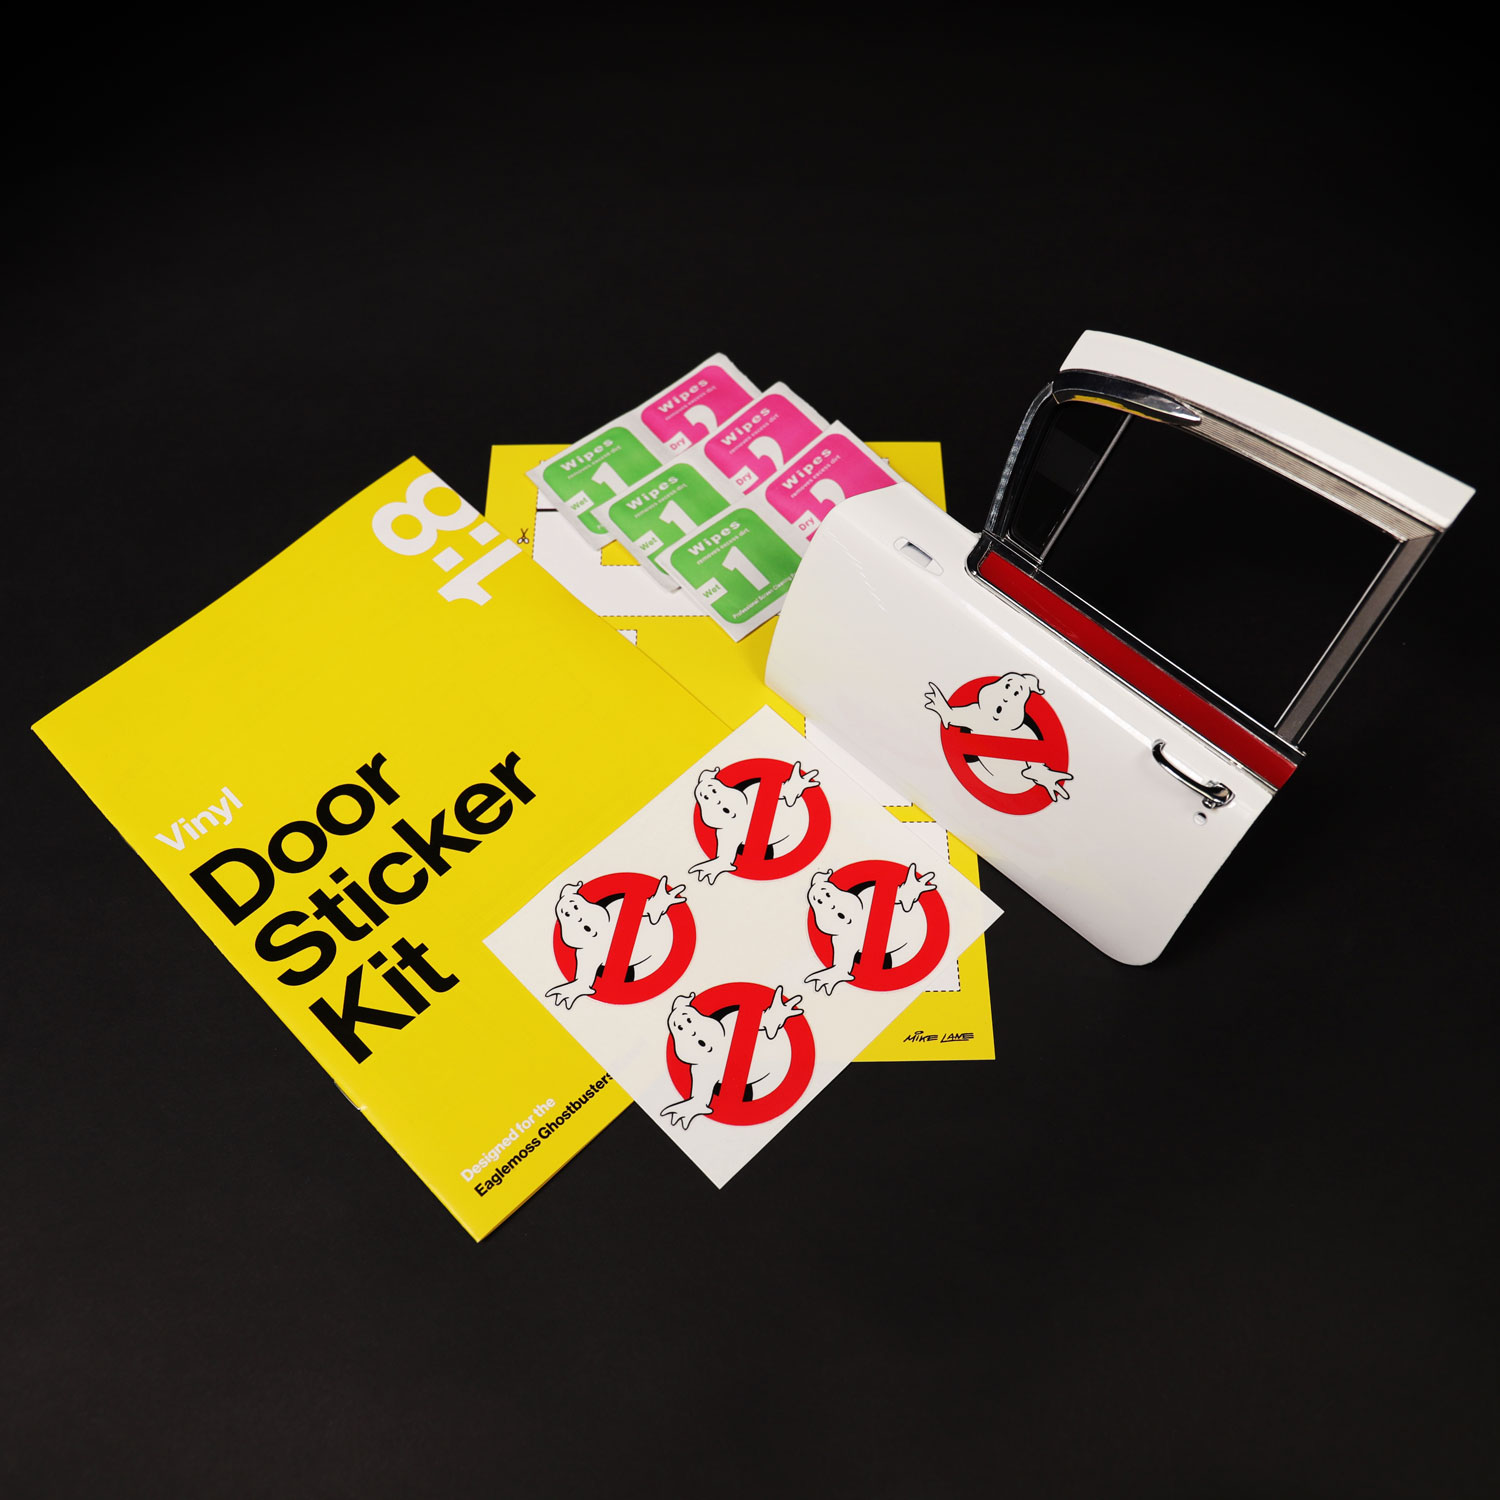
1 x 8-page fully illustrated step-by-step instruction booklet
3 x ‘Wet and Dry’ wipes – for cleaning the doors prior to installation
Detail matters
At scale it’s easy to overlook the finer details, but on a vehicle as iconic as the Ecto-1 it’s important to get them right. Below explains the style differences across both Ghostbusters movies to present day usage, the research, reasoning and the additional detailing which have all been carefully considered within these kits:
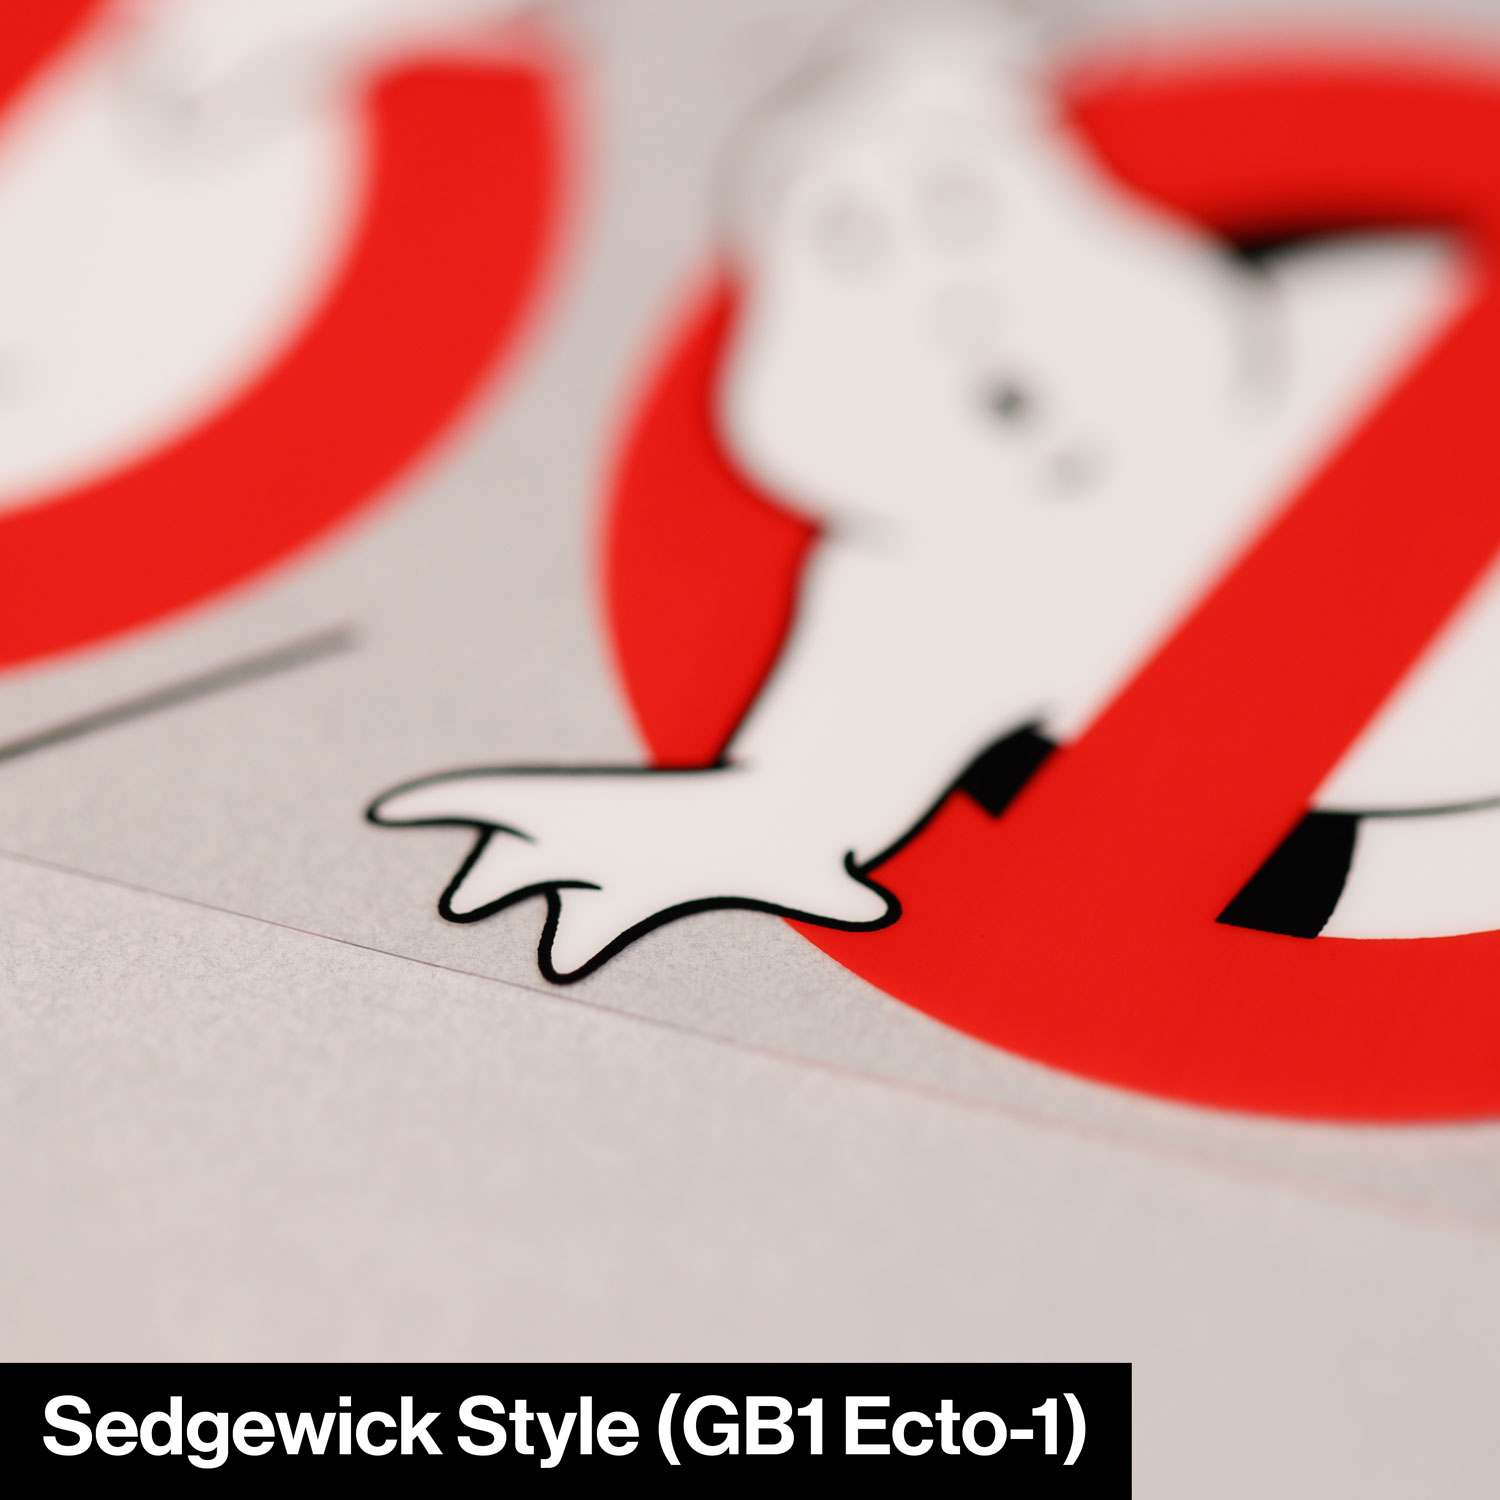
Sedgewick vs Traditional – What's the difference?
There are two options of the ‘No-Ghost’ logo available (aka “the Mooglie”). Technically, there is no right or wrong here. Both versions make appearances on the original Ecto-1, be it in Ghostbusters, Ghostbusters II, in later restorations to the original vehicle, and even in Afterlife – so here it comes down to personal choice and which Ectomobile you are aiming to replicate.
People often ask me which style I prefer, and for me it’s hands-down the Sedgewick. This is the style I’m using on my own Ecto-1 model. I go on to explain the differences below, but when the Sedgewick-style ‘No-Ghost’ logo appears in the original 1984 movie, it is the first time we see the Ghostbusters logo clearly on the Ecto-1. Here I explain the differences in more detail:
Sedgewick (Original Ghostbusters Ecto-1 – 1984)
Arguably the original Ghostbusters logo, this style was used on the Ecto-1 in the 1984 movie Ghostbusters. It is seen clearly for the first time when the Ecto-1 comes to a stop outside of the Sedgewick Hotel.
The Mooglie in this logo differs slightly, primarily in the hand detailing (left and right side). I have personally re-artworked this ‘No-Ghost’ logo from the ground up to precisely match the logo style from this iconic scene.
Whilst the differences are subtle, this logo feels special (to myself at least), as it’s truly authentic to the original film – teleporting me straight back to the skin-tingling moment when the Ecto-1 screams out of the firehouse on its first call.
For anyone wishing to match their Ecto-1 model to the original 1984 Ghostbusters movie, this is the style for you.
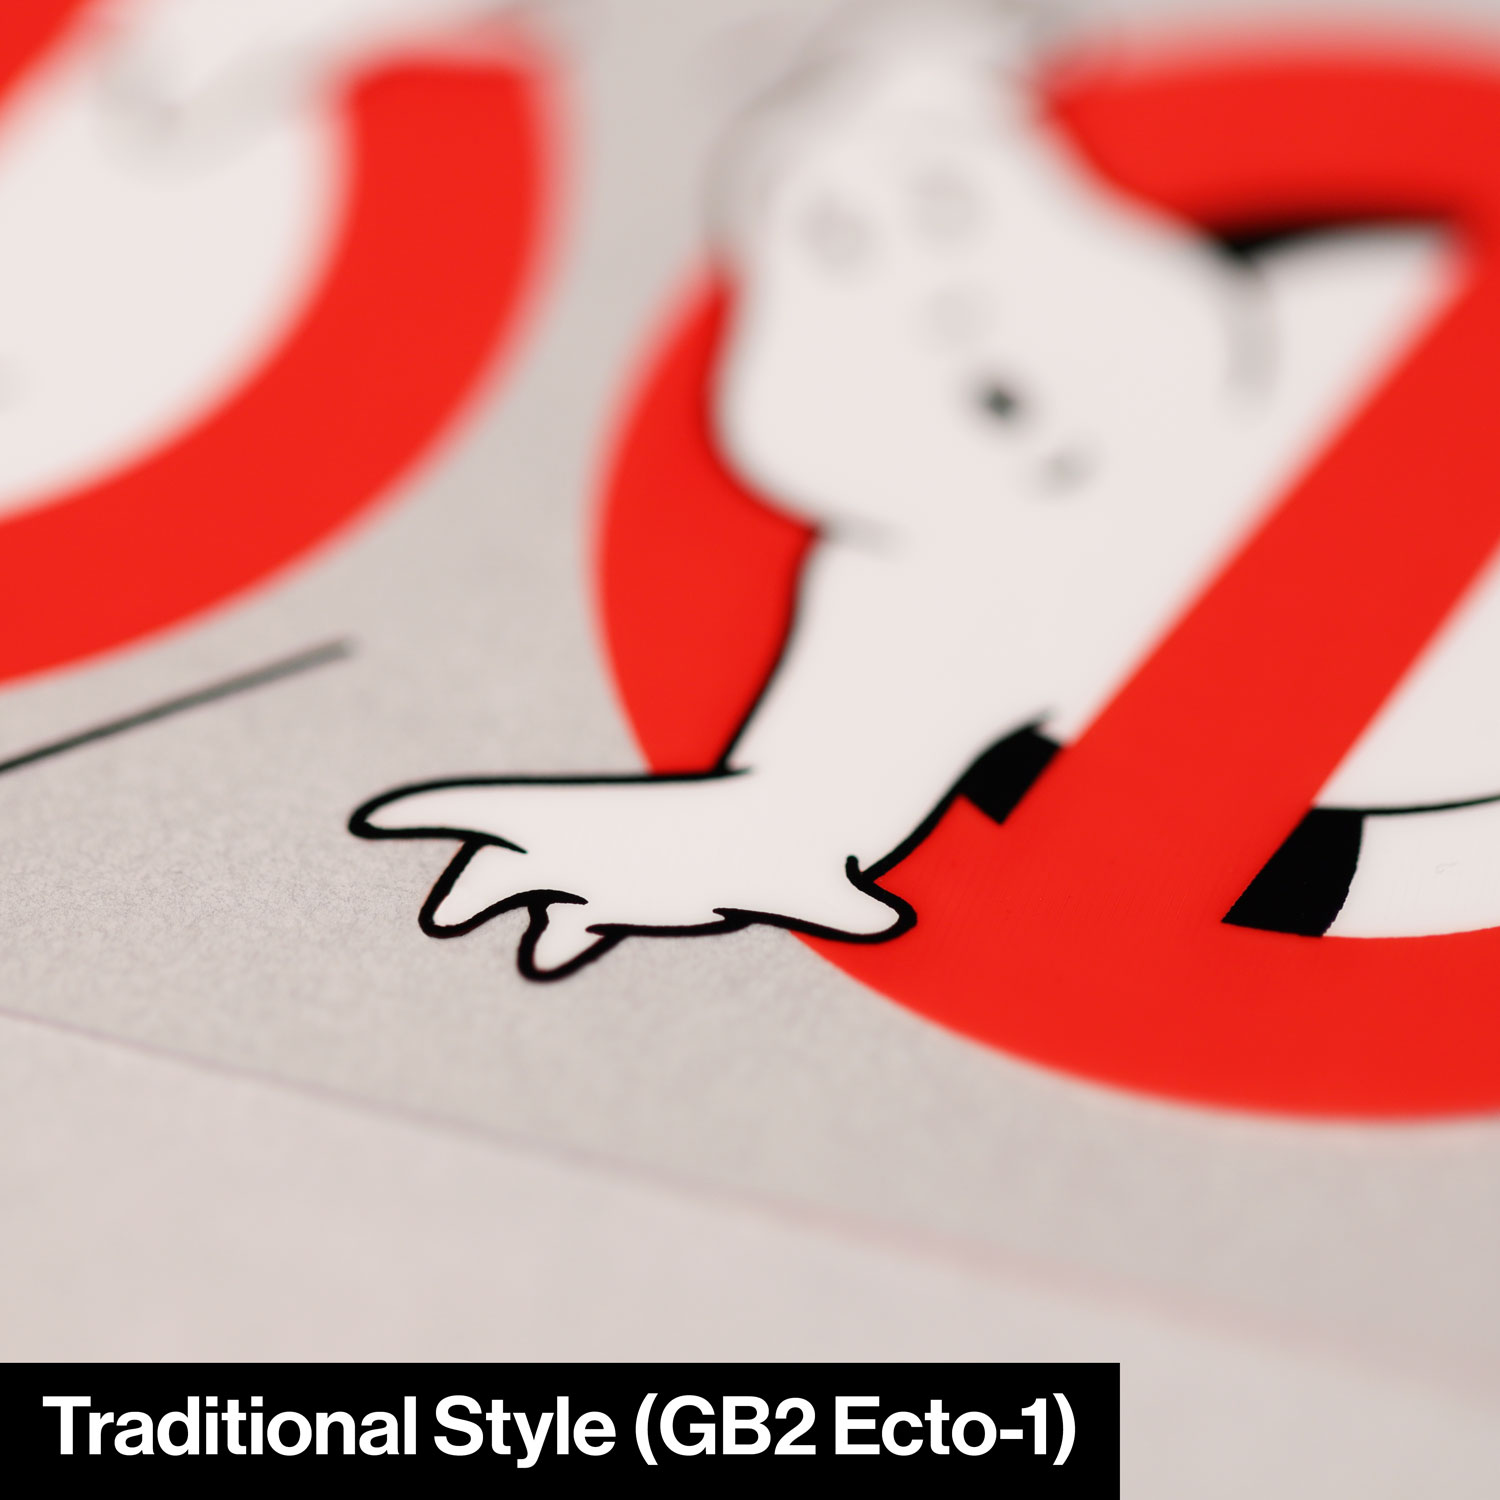
Traditional (Ghostbusters II Ecto-1 – 1989-Present day )
This style of Ghostbusters logo is the one most of us all know and love, and also recognise the most.
Seen on the Ecto-1 at the start of Ghostbusters II and on later restorations of the vehicle, this is also the main logo used on all official Ghostbusters marketing materials and merchandise to the present day.
It’s also worth noting that if you plan on producing an Afterlife version of the Ecto-1, you will want to use this Traditional style logo, as it’s the one seen on the vehicle in the movie – even though the Ecto-1 used in Afterlife is actually one of the original Ecto-1a vehicles! (shhhh!)
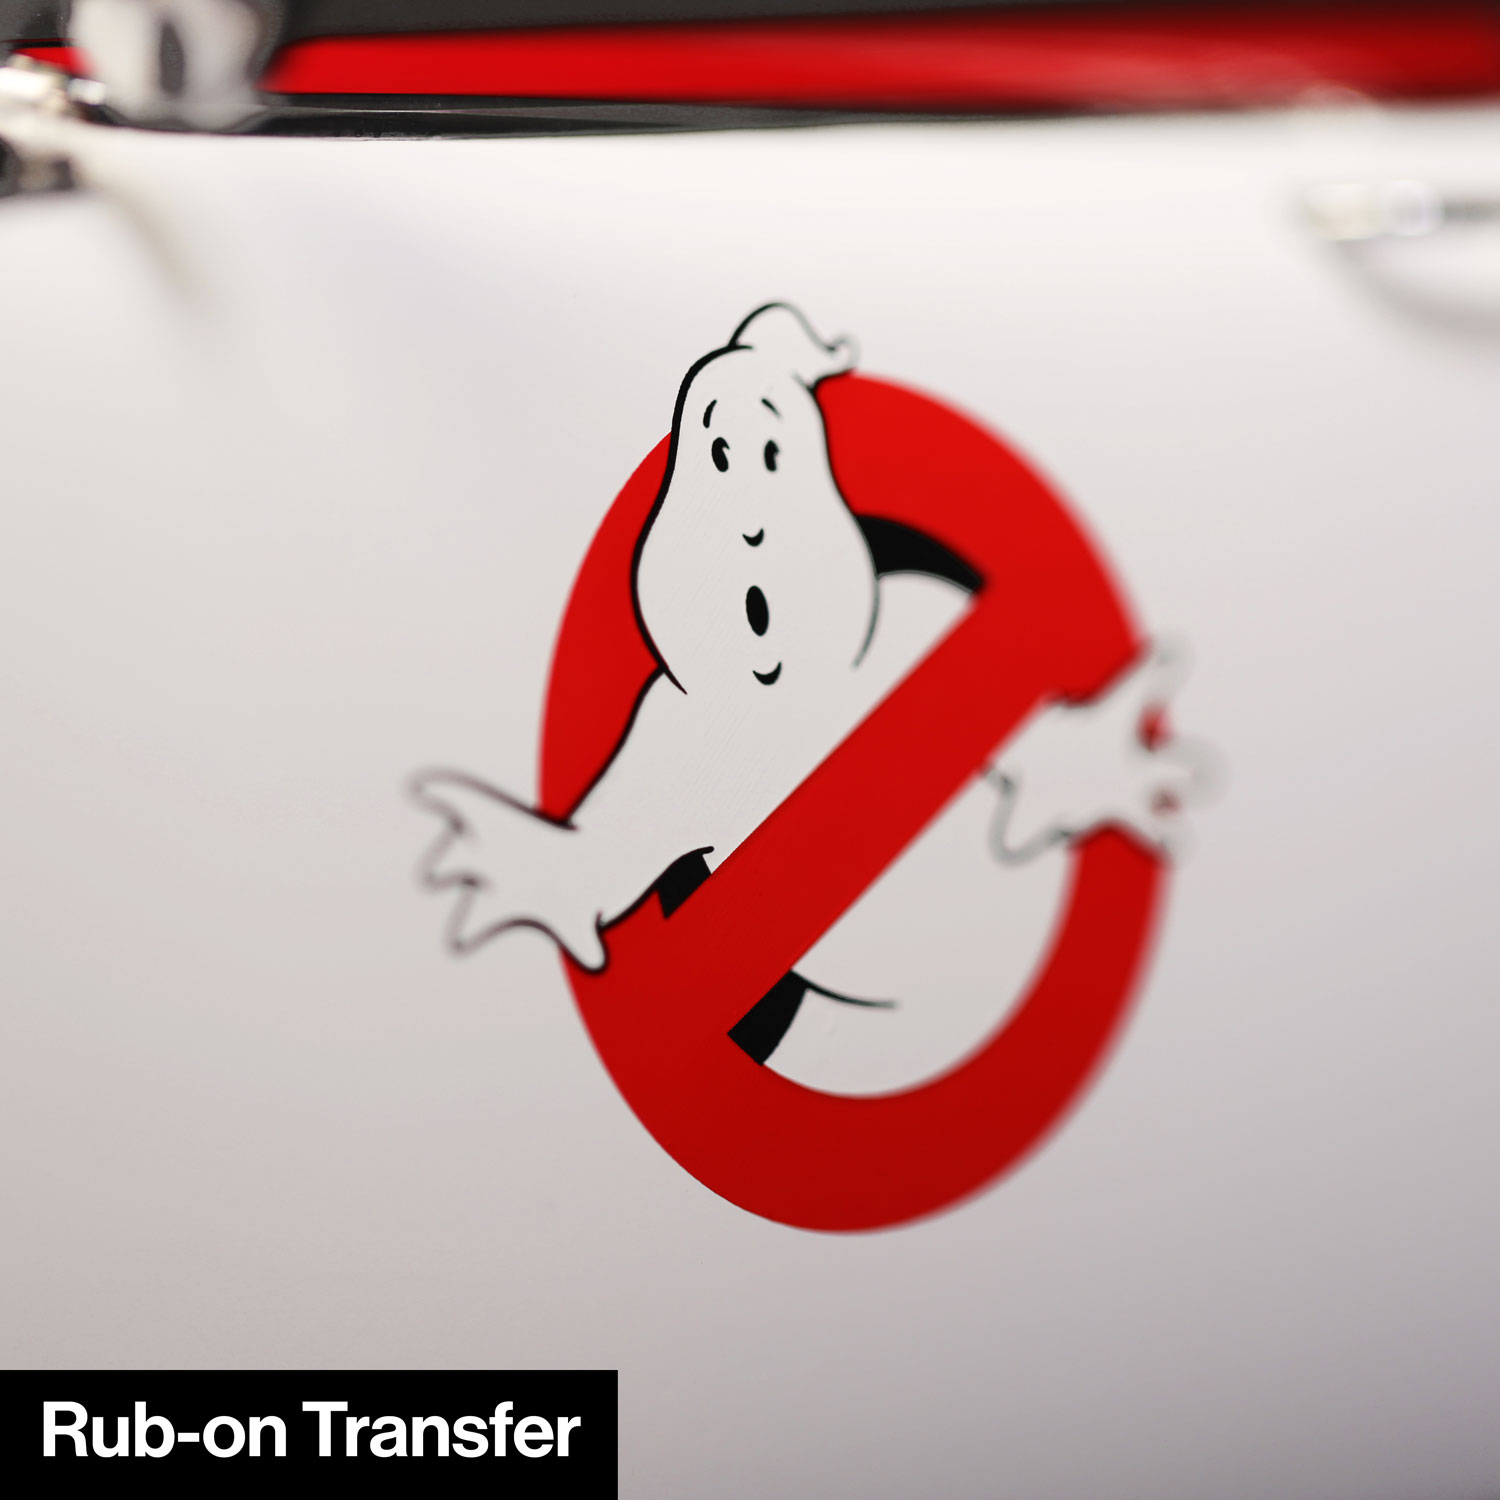
Rub-on Transfers vs Vinyl Stickers – What's the difference?
If you’re not already familiar with my rub-on transfer sets, they use specialised Pantone® inks with a high-strength self-adhesive backing. When rubbed over, the designs are transferred directly to the surface, looking as if they have been painted directly onto the model. No soaking, no residue, and no raised edges. Just a clean design transferred directly to your model.
Because of the specialised process, rub-on transfers are considerably more technical, time-consuming and expensive to produce compared to stickers, but the difference in price is reflected in the finish and print quality.
Depending on the model and application, they generally look much more realistic and impressive when applied, designed to look like they were originally printed on the model parts.
Rub-on transfers are easy to apply and have a much higher clarity print than stickers. They also have the advantage of not having any raised edges.
Whilst my vinyl sticker sets are of course still printed in high resolution and to a very high standard, if you’re looking for the ultimate upgrade for your model, rub-on transfers are the way to go!
Logo size, angling and positioning
The logos have been correctly scaled to exactly how they looked in the movie, and positioning templates are provided to allow you to easily and accurately place the logos in the correct positions.
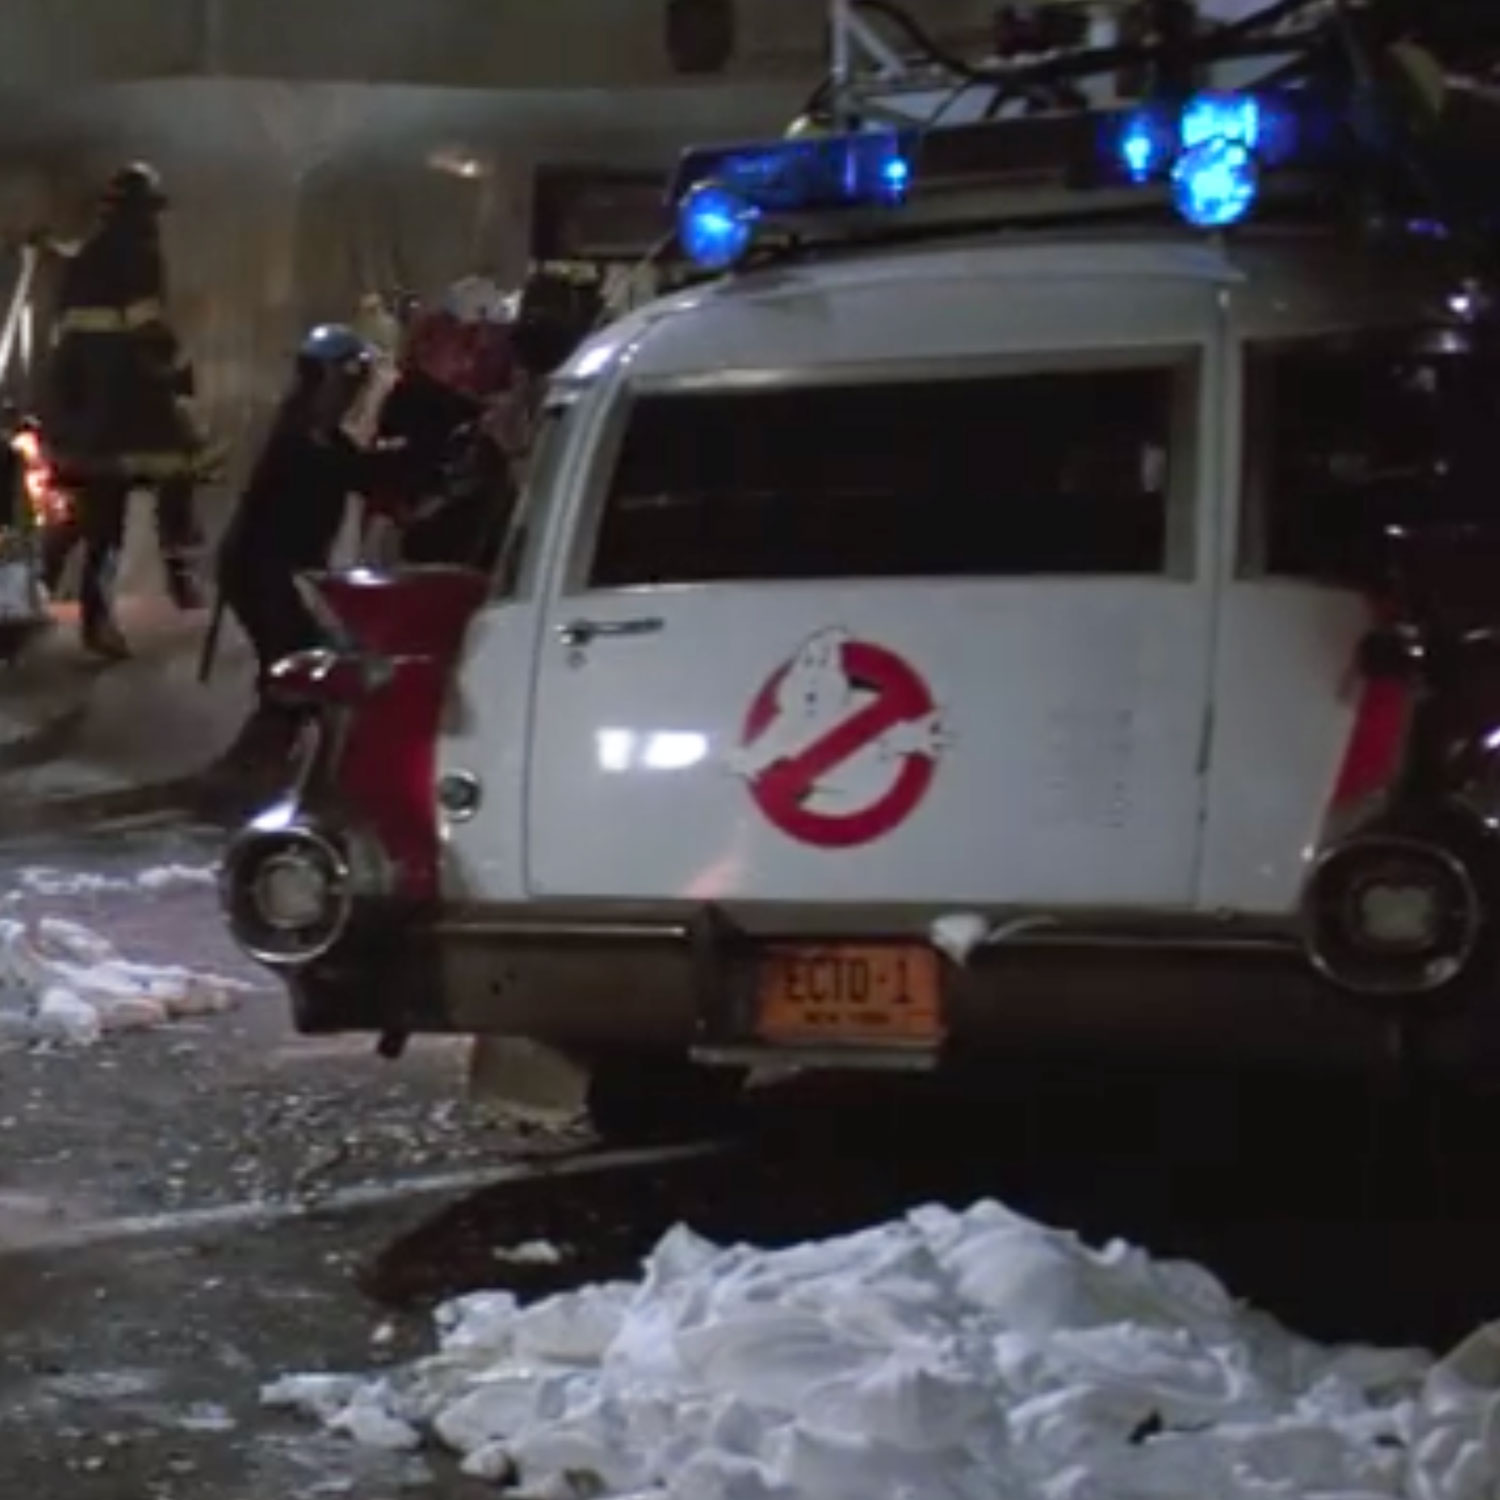
If you’ve seen photos of the recently restored Ecto-1, you’ll notice that the logo on the rear cargo door is significantly larger than on the side doors. However, in the movie it is clear to see that the original Ecto-1 used a smaller logo on the rear – matching exactly that of the side doors.
After painstakingly measuring and scaling all the logos directly from numerous scenes in the movie and archival photos of the original Ecto-1, I have matched these logos to precisely how they looked on the car in the movie – rather than from photos of later restorations.
How the logos should be angled on the doors can also be confusing. On the restored vehicle, and in the Eaglemoss magazine, it states that the logos should be placed with the diagonal centre line at 45°. However, again it is clear in the movie that the original Ecto-1 had the logos applied relatively level, with the diagonal centre line closer to 30°. It’s also worth noting that this is the angle at which the official logo is used on all Ghostbusters marketing.
Again, I have matched the transfers in this kit exactly to how the logos looked in movie, at the correct angles and scale.
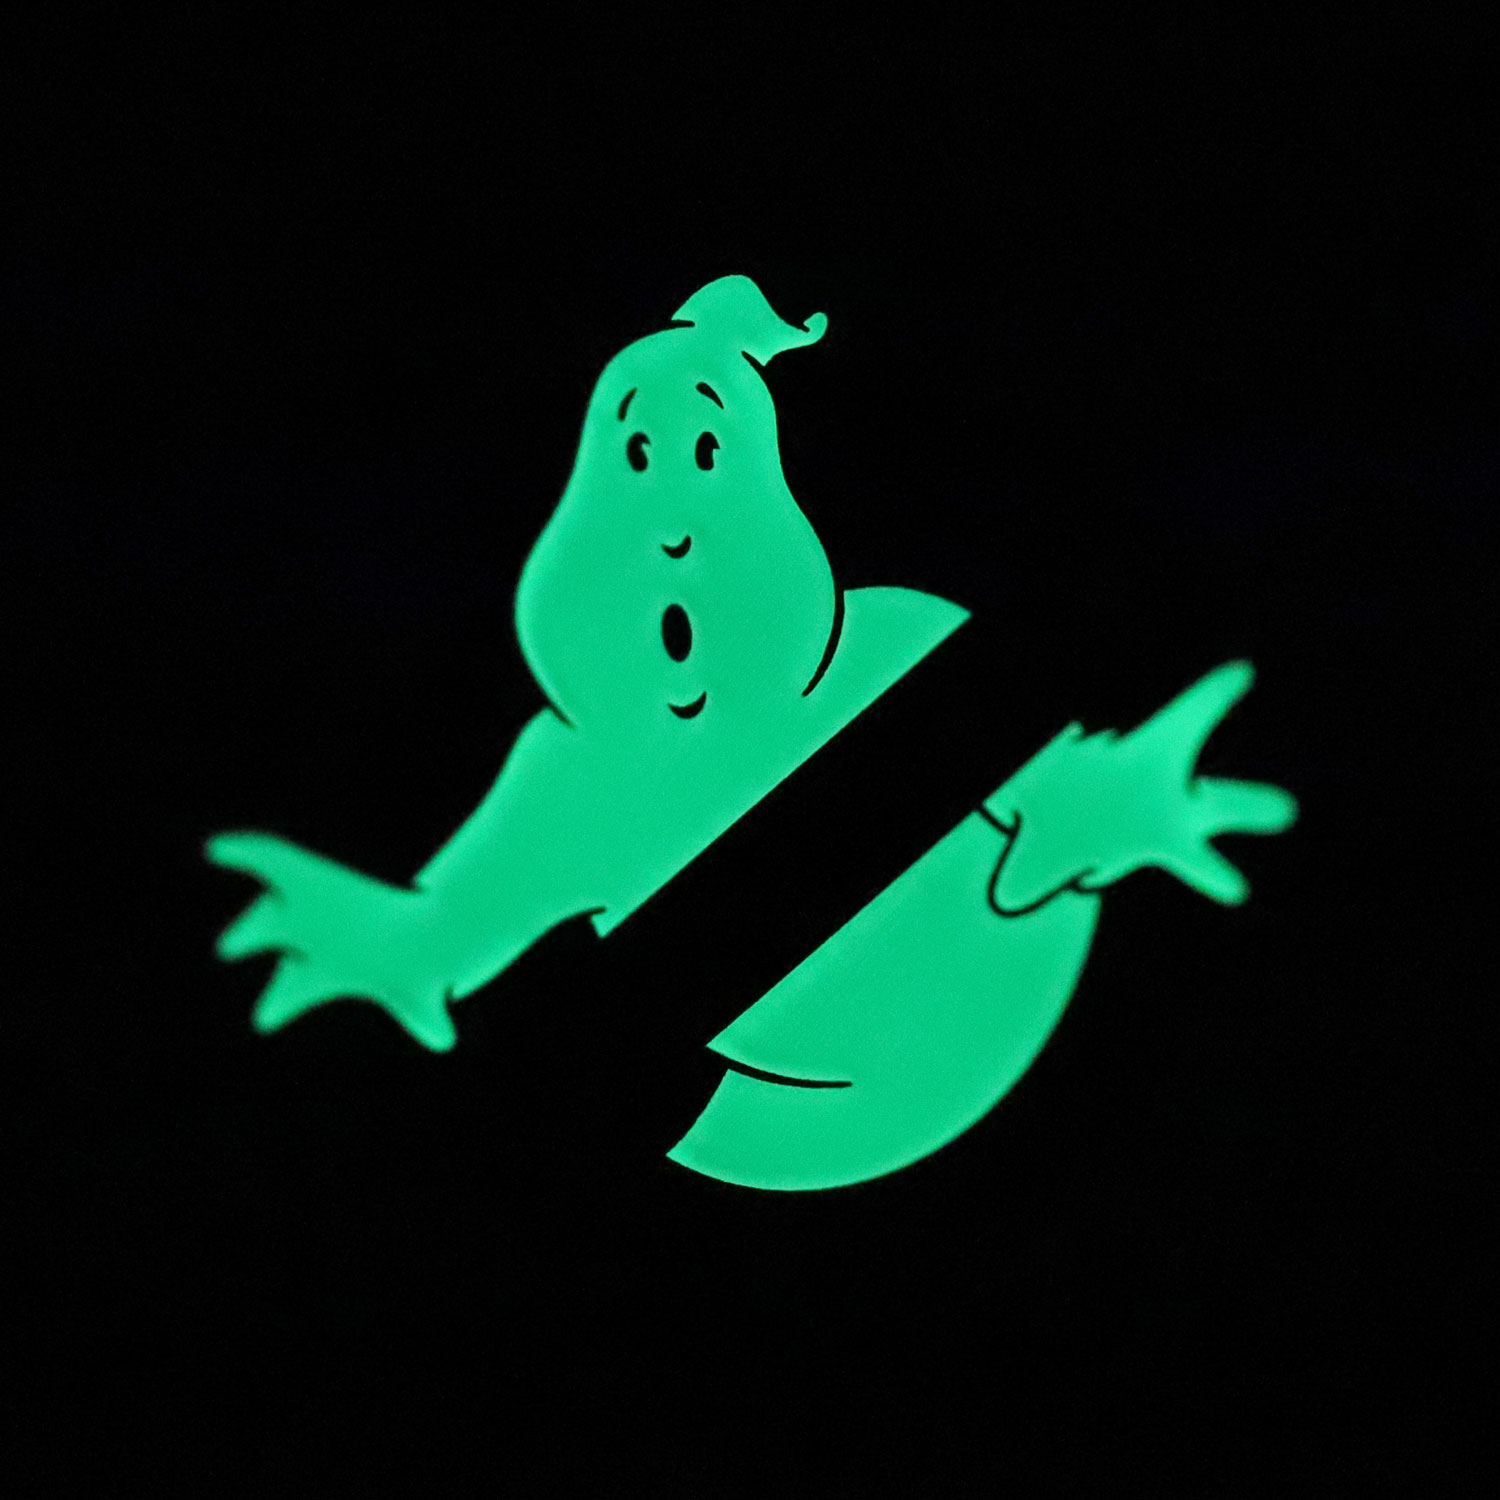
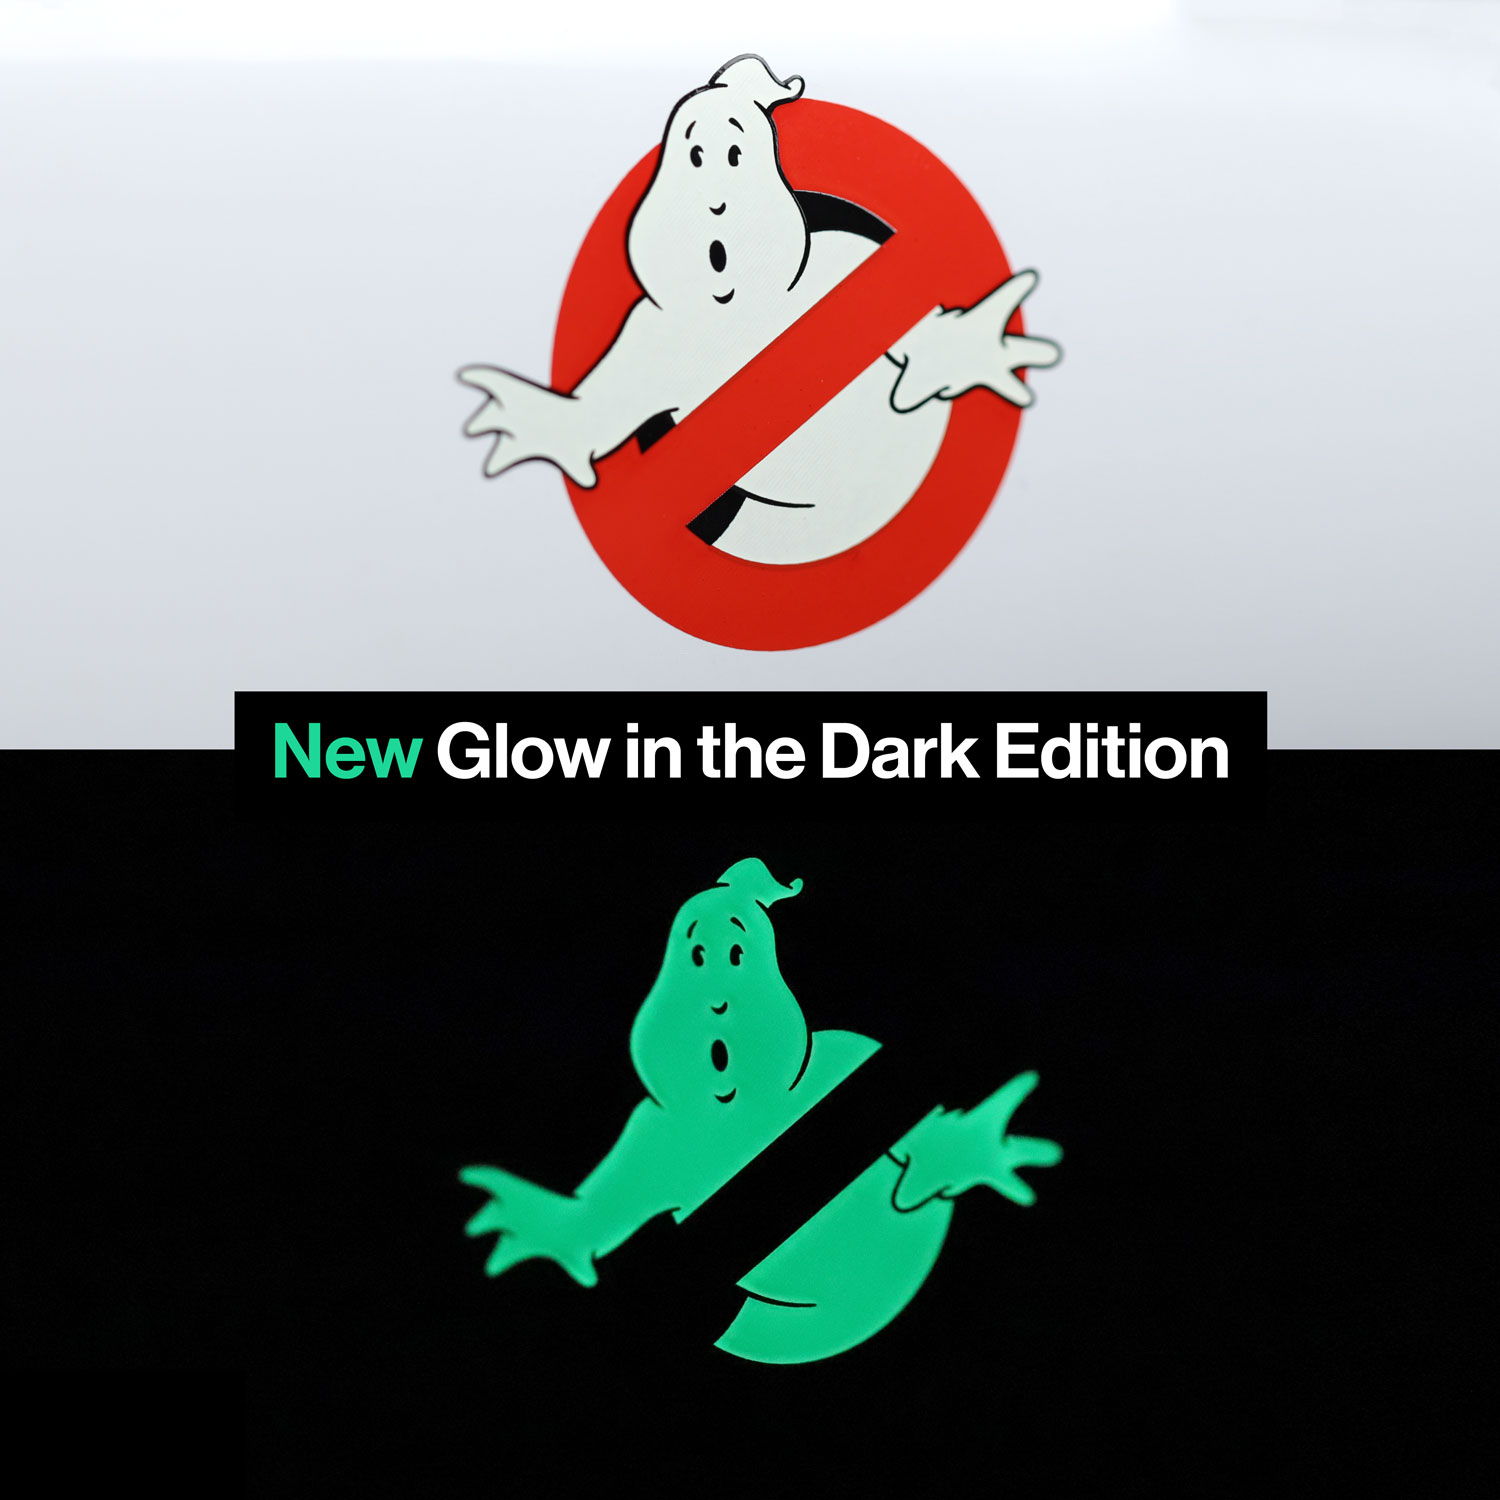
Glow in the Dark Edition
Exclusive to my rub-on transfer kits, your door logos can now glow in the dark. During the day the ghost will appear white, as per normal, but at night your model will look spectacularly spooky! Whilst the no-ghost logos on the real Ecto-1 never glowed, these really help to make your model special – by far my personal favourite and the ones I’m using on my own model. A neat little easter egg when the lights go out!
All other model parts and accessories shown in the photos outside of the ‘What’s included’ list above are not included and are shown purely for demonstration and application purposes.
Designed for Stage 80, 91 and 102 of the Build the Ghostbusters Ecto-1 by Eaglemoss. View build planner
Installation instructions
Ahead of installation, I would highly recommend watching the walkthrough videos below. This will help to ensure you get the perfect finish and will avoid any potential slip-ups.
Fully illustrated, step-by-step instructions are also provided with the kit.
Removing the pre-applied door stickers
For some of us, issues 91 and 102 came with the door stickers pre-applied to the doors.
Thankfully these stickers can be removed aided with a little heat from a hairdryer or steamed off with a kettle, and then cleaning any remaining sticky marks with some Isopropyl Alcohol Cleaner and soft, microfibre cloths.
To avoid scratching your door during the cleaning process, only use soft microfibre cloths, avoid ‘scrubbing’ in small areas and clean in as little number of passes as possible across the entire door. I would recommend applying the alcohol to the doors with wet wipes, this keeps the door wet as you clean and reduces the risk of scratching. Avoid using dry paper towels at all costs! Keeping the door wet during the cleaning process will give you much better results and will avoid damaging the doors finish.
You will also notice small positioning marks printed on the door beneath the stickers, but again, these can be removed using alcohol cleaner together with the spudger tool provided within this kit. You find some of these marks are more stubborn than others, but with some patience and frequent soaking of alcohol cleaner between passes they will remove. When using the spudger tool, ensure the door is wet with alcohol to avoid scratching the surface.
Once you are finished, I would recommend cleaning the door with a final pass of alcohol cleaner quickly followed by a pass of warm water to remove any remaining residue from the alcohol cleaner, and then lightly dried and polished with a microfibre cloth.
Rub-on Transfer Installation Video:
https://youtu.be/IGQOy5nW614&rel=0
Vinyl Sticker Installation Video:
https://youtu.be/WnkEDraqT5E&rel=0
Available as either rub-on transfers featuring specialist transferable Pantone® inks, or as vinyl stickers, these easy-to-use kits replace and upgrade the ‘No-Ghost’ stickers provided with the model – correcting the scale and providing a higher quality and more authentic finish.
These kits include everything you need to replace the oversized stickers provided with the Eaglemoss Ecto-1 model. At the same time, they add an altogether higher quality finish and match the doors of your Ecto-1 perfectly to how they looked in the 1984 Ghostbusters movie.
Installation is easy, with positioning templates, a spudger tool for application and fully illustrated instructions provided to take you through each step. The whole process takes no more than a few minutes for each door.
The vinyl stickers are as easy as peel and stick, and the rub-on transfers (not to be confused with waterslides, yuk!), are a premium product with the unique ability to transfer self-adhesive Pantone® inks directly to the surface, looking as if the design has been printed directly onto the model part! Application of the rub-on transfers is a little more technical but gives a better finish compared to stickers.
The ‘No-Ghost’ logos are available in two styles, each accurately matching different versions of the Ecto-1 from the Ghostbusters and Ghostbusters II movies where the logo varies slightly (see Logo styles – Traditional vs Sedgewick below for an explanation).
1 x 8-page fully illustrated step-by-step instruction booklet
3 x ‘Wet and Dry’ wipes – for cleaning the doors prior to installation
Detail matters
At scale it’s easy to overlook the finer details, but on a vehicle as iconic as the Ecto-1 it’s important to get them right. Below explains the style differences across both Ghostbusters movies to present day usage, the research, reasoning and the additional detailing which have all been carefully considered within these kits:
Sedgewick vs Traditional – What's the difference?
There are two options of the ‘No-Ghost’ logo available (aka “the Mooglie”). Technically, there is no right or wrong here. Both versions make appearances on the original Ecto-1, be it in Ghostbusters, Ghostbusters II, in later restorations to the original vehicle, and even in Afterlife – so here it comes down to personal choice and which Ectomobile you are aiming to replicate.
People often ask me which style I prefer, and for me it’s hands-down the Sedgewick. This is the style I’m using on my own Ecto-1 model. I go on to explain the differences below, but when the Sedgewick-style ‘No-Ghost’ logo appears in the original 1984 movie, it is the first time we see the Ghostbusters logo clearly on the Ecto-1. Here I explain the differences in more detail:
Sedgewick (Original Ghostbusters Ecto-1 – 1984)
Arguably the original Ghostbusters logo, this style was used on the Ecto-1 in the 1984 movie Ghostbusters. It is seen clearly for the first time when the Ecto-1 comes to a stop outside of the Sedgewick Hotel.
The Mooglie in this logo differs slightly, primarily in the hand detailing (left and right side). I have personally re-artworked this ‘No-Ghost’ logo from the ground up to precisely match the logo style from this iconic scene.
Whilst the differences are subtle, this logo feels special (to myself at least), as it’s truly authentic to the original film – teleporting me straight back to the skin-tingling moment when the Ecto-1 screams out of the firehouse on its first call.
For anyone wishing to match their Ecto-1 model to the original 1984 Ghostbusters movie, this is the style for you.
Traditional (Ghostbusters II Ecto-1 – 1989-Present day )
This style of Ghostbusters logo is the one most of us all know and love, and also recognise the most.
Seen on the Ecto-1 at the start of Ghostbusters II and on later restorations of the vehicle, this is also the main logo used on all official Ghostbusters marketing materials and merchandise to the present day.
It’s also worth noting that if you plan on producing an Afterlife version of the Ecto-1, you will want to use this Traditional style logo, as it’s the one seen on the vehicle in the movie – even though the Ecto-1 used in Afterlife is actually one of the original Ecto-1a vehicles! (shhhh!)
Rub-on Transfers vs Vinyl Stickers – What's the difference?
If you’re not already familiar with my rub-on transfer sets, they use specialised Pantone® inks with a high-strength self-adhesive backing. When rubbed over, the designs are transferred directly to the surface, looking as if they have been painted directly onto the model. No soaking, no residue, and no raised edges. Just a clean design transferred directly to your model.
Because of the specialised process, rub-on transfers are considerably more technical, time-consuming and expensive to produce compared to stickers, but the difference in price is reflected in the finish and print quality.
Depending on the model and application, they generally look much more realistic and impressive when applied, designed to look like they were originally printed on the model parts.
Rub-on transfers are easy to apply and have a much higher clarity print than stickers. They also have the advantage of not having any raised edges.
Whilst my vinyl sticker sets are of course still printed in high resolution and to a very high standard, if you’re looking for the ultimate upgrade for your model, rub-on transfers are the way to go!
Logo size, angling and positioning
The logos have been correctly scaled to exactly how they looked in the movie, and positioning templates are provided to allow you to easily and accurately place the logos in the correct positions.
If you’ve seen photos of the recently restored Ecto-1, you’ll notice that the logo on the rear cargo door is significantly larger than on the side doors. However, in the movie it is clear to see that the original Ecto-1 used a smaller logo on the rear – matching exactly that of the side doors.
After painstakingly measuring and scaling all the logos directly from numerous scenes in the movie and archival photos of the original Ecto-1, I have matched these logos to precisely how they looked on the car in the movie – rather than from photos of later restorations.
How the logos should be angled on the doors can also be confusing. On the restored vehicle, and in the Eaglemoss magazine, it states that the logos should be placed with the diagonal centre line at 45°. However, again it is clear in the movie that the original Ecto-1 had the logos applied relatively level, with the diagonal centre line closer to 30°. It’s also worth noting that this is the angle at which the official logo is used on all Ghostbusters marketing.
Again, I have matched the transfers in this kit exactly to how the logos looked in movie, at the correct angles and scale.
Glow in the Dark Edition
Exclusive to my rub-on transfer kits, your door logos can now glow in the dark. During the day the ghost will appear white, as per normal, but at night your model will look spectacularly spooky! Whilst the no-ghost logos on the real Ecto-1 never glowed, these really help to make your model special – by far my personal favourite and the ones I’m using on my own model. A neat little easter egg when the lights go out!
All other model parts and accessories shown in the photos outside of the ‘What’s included’ list above are not included and are shown purely for demonstration and application purposes.
Thanks to mike lane mods, my ecto 1 is looking so much better. These door transfers are so easy to apply. They are so much better than the ones that came with the build. Thank you so much Mike for such attention to detail & helpful tips. When it comes to these mods, yours are simply the best
Rated 5 out of 5
Steve Munford(verified owner)–
These are superb! Mike’s instructions complement the stickers but ensure you clean that surface perfectly, otherwise you will see every blemish. Remove the old ones with a hair dryer and alcohol. Highly recommend!
N.B. They are delicate when on, so ensure you assemble the doors first and affix them just before you screw them to the vehicle. I damaged one without realising it so had to use the ‘spare’.
Rated 5 out of 5
Dallas Haigh(verified owner)–
Mike does it again, far better than EM'S sticker.
One already done on the left door.


Andrew ditulo (verified owner) –
As usual Mike's mods are fantastic
michael wicks (verified owner) –
Thanks to mike lane mods, my ecto 1 is looking so much better. These door transfers are so easy to apply. They are so much better than the ones that came with the build. Thank you so much Mike for such attention to detail & helpful tips. When it comes to these mods, yours are simply the best
Steve Munford (verified owner) –
These are superb! Mike’s instructions complement the stickers but ensure you clean that surface perfectly, otherwise you will see every blemish. Remove the old ones with a hair dryer and alcohol. Highly recommend!
N.B. They are delicate when on, so ensure you assemble the doors first and affix them just before you screw them to the vehicle. I damaged one without realising it so had to use the ‘spare’.
Dallas Haigh (verified owner) –
Mike does it again, far better than EM'S sticker.
One already done on the left door.